Tuesday, December 11, 2018

2018 year end wrap up

2018, for Nigel, was not great by a wide margin.

I had to tear down what was essentially a new engine due to build quality issues.  After spending an idiotic amount of time negotiating with Chico to get replacement parts and paying an additional $1500 to rebuild the engine with better quality parts, I'm hoping that the engine issues are behind me.  I won't really know until I put the pan back together and install the engine but there's a whole host of self-inflicted problems to resolve before that can happen.  And the whole thing depends on my desire to work on the car.

The IRS conversion is started but there's still a lot to do before it's done.  I'm not thrilled with the overall fit of the parts but I'll work with what I've got to get it back on tires before I get too picky with appearances and finish.  Speaking of finishes - I'll probably strip the rear arms of powdercoated paint to fix the shock collars, then paint them again...so I'll have wasted another $240 by having that done only to strip it all off.  Knowing that I'll have to spend the money again is incentive to just leave the car alone.  I'm tired of spending money on this car.

The 'open tasks' include figuring out where to put the oil cooler, running the lines and then taking it all back out of the car again for paint and fabrication to be completed...then I get to put it back together (again).

The carpet I recently bought was returned to the seller and I got a refund for the carpet - it cost me over $100 to test fit it to the car and send it back.  I'm not going to fuck around with carpet until the car is ready for it...and, admittedly, that's looking a long way off at this point so I don't have to even think about it for quite some time.  I am no longer buying parts and, for the first time in years, I'm not even looking at parts for this car.  Other than reconnecting with a few friends - I've no interest in going to the VW shows or scheduling my family vacation to California around the big show weekend in June.

In a few short months, I'll have owned this car for FIVE years and the longest trip it has taken was 20 minutes long on a new engine that never ran right.  Nigel hasn't left the driveway of the current house since it was driven into the garage by Jim when it showed up in May 2018.  I suspect that it'll leave this house in ~ five months on a trailer, still on the body cart.

My priorities are changing as my life changes and this remains one of those areas where I'm just not getting a return on my investment - either in 'time well spent' or 'enjoying what I'm doing'.  It's hard to monetize those two very subjective terms but I know that the return on what I've spent is what I'd characterize as highly disappointing.  The 'joy' in this hobby, for me, is no longer there.

I've sold off a majority of my excess parts and what I haven't sold will go back up for sale in the Spring - the divesting of extra parts will continue until I'm done.  If I decide to sell this car - I'm wholly finished with the hobby. One way or another, 2019 will be the year to make something happen.  The good news is that it can't get much worse.

Saturday, November 24, 2018

I'm trying my hardest to not act how I feel

I received the carpet kit from Germany today - the rear seat kick panel was the first piece I fit and, while not perfect, it's decent.
I was warned about this front piece not being the correct shape - not ideal but not the end of the world, really.
I centered the heater vent on the body and then followed the piece back to see how it'd navigate the seat track and end at the rear seat kick panel.

The heat vent grommet bit fits great from that point forward.
 Moving toward the rear of the car - the carpet starts to show some issues.  There's an awkward joining of pieces where the front of the seat track is on the rocker - it's cut too 'early' so there's a gap between where the cut is on the carpet and the 'beginning' of the seat track...
...which also means that it's off centered with the seat track and fouls the 'end' of the seat track.

There's not a whole lot I can do to shift the location of this cut to the rear without recreating the entire piece.
The toughest part is that the length is too short overall.  This is consistent on both sides of the car, unfortunately, and cannot be fixed without being replaced.

The center piece is almost long enough...too bad it's not a hand grenade.
This inner seat track cut is done nicely and it seems to fit properly.
Another angle of the seat track cut where it meets the second half of carpet.  The two pieces of carpet have a very small overlap and I suspect that they will not stay where they belong over time.
The tunnel carpet at the front, however, is way too large and pops up by a good 1-2" over the tunnel.  I originally thought that the yet to be installed insulation would take up some of that - but then realized that it's not going to take up enough of it to bring this back down to a normal level.

This could, should I choose, be corrected by removing material from the outer edges of this piece.  It won't fix the other issues that crop up in this carpet kit though.

I knew that there were a couple of issues with the carpet kit but they seemed to be rather minor in scale.  If the kit were too 'big', I could have that fixed - but I can't do anything about carpet that's cut too short and off - center.

I think I should have kept the money in my pocket and had carpet fitted to the car once it was done.  Yet another place where I tried to be proactive and get a limited run of a part that simply doesn't fit and will require a lot of work (and more money) to get it right.

Spending money on this car continues to prove to be a bad idea...

Monday, November 12, 2018

You cannot make progress without making decisions

Nigel is turned sideways and pushed to the back of the garage so that we can fit at least one of the two 'regular' cars in the garage.  In addition to all of the random stuff in the picture - a snowblower has been added to the garage inventory and floor space has rapidly vanished.  In order to fix the poor workmanship from Randy - I'll have to remove the pan from the body and set it up on sawhorses or jack stands and I just don't have room for that with one of the 'daily drivers' in the garage.
For a short time, I debated dropping the pan at RediStrip and having it dipped - but I can clean away the botched sections of the pan - fix the welding, install the correct parts, clean, strip and paint them to match the rest well enough to get the job done without the added work of repainting the entire pan.  The interior side of the pan will be mostly covered up by insulation so I'm not as concerned with perfection there - just that the two halves of the kick panel match - unnecessary holes are welded shut and the dents are removed where possible.  There are a few other welds that need to be cleaned up and then it should be ready for paint touch up.  I'll likely address the issues with the subframe at that time as well since it's easier to paint things in batches.

I borrowed a wheel adapter from Jim and dropped all ten wheels off at the local Midas - they said they could do a quick wheel spin to determine which wheels were bent and which are straight.  I was quoted a time of about 2 hours to do the job.  After 24 hours of no contact by them, I went to the shop to discover that they were done and claim that only one of the 10 wheels is straight.  They damaged the wheel adapter so when I returned it to Jim - we discussed it and after trying to determine a value, we agreed that I'd pay him $50 to replace it.  So, it cost me nearly $100 to check ten wheels for straightness - and I bet that they didn't even check them all so I'll have to do it again.  I wrote them a nice one star review on Google for their shit effort.

Now that I'm back to the working world - this project is now on hiatus until Spring.  There will be a few updates as they happen (or if they happen) - otherwise, it's going to be quiet here for a while.

Monday, October 29, 2018

An industrious dunce is often more successful in life than his learned neighbor.

 The dry fit today went okay - I've had to let go of a lot of my obsession over parts fitting perfectly to get here.  The right side fits really well and after I take this all apart, paint the spring plates and put it back together, it should be good to go.

I have one spare spring plate in the event I somehow screw up the two that are currently on the subframe.  The one I worked on yesterday is toast and has been tossed into the scrap bin.
A loose fitting of the trailing arm, urethane bushings and nuts/bolts.

Doing this conversion was a lot more work than I'd planned - especially where modifying parts that are marketed to 'fit' together was required.

Next steps - I'll take this apart, prep the spring plates for paint and, weather permitting (supposed to be 63ºF on Tuesday), I'll get them painted and then let them dry/cure over a long period of time while I sort out the pan situation.

Sunday, October 28, 2018

It'll never be enough

Today - I attempted to figure out the fitment issues between the Jaycee retainer and the Sway Away spring plates.  The Sway Away parts have very large welds that interfere with the Jaycee brass bushing, in spite of the fact that Jaycee has created a large radius to clear the weld.  There's a lot of weld splatter that had to be removed to allow for smooth movement should the retainer contact the spring plate.  The weld splatter removal was the easy part.  Then I hit the learning curve.
 I was able to get the welds ground down enough to allow the Jaycee retainer to move smoothly around the spring plate.  This being the first time I've had to do anything with the spring plate - I tried a flap wheel, a grinding wheel and emery cloth.

The emery cloth was very slow going and didn't seem to be removing the material that is required to get the retainer on the snout.  So I switched over to the grinding wheel - which did a really good job of removing material but it was hard to control the level of removal due to the aggressive nature of the tool.  I swapped over to the flap wheel - slightly easier to control but I still managed to hit the snout a couple of times in places I didn't want to (one of which is shown in the pic).  This is a practice piece so I'm not super worried about it - live, learn and move forward.
I decided to try the dry fit of the spring plate - check for any additional interference with parts.  And, of course, I found one between the spring plate and the subframe housing.


At this point, I had the flap wheel on the grinder so that's what I used.  I wound up getting a bit carried away and removed too much from the top of the spring plate and created a slope.  Oh well, practice piece and all - not worried about it.  I have three more pieces before I get too excited about it.

I'm considering not using the Jaycee retainers and just using stock parts - the variation in quality on the Sway Away spring plates won't be as big of an issue and installation should be easier to deal with.  The rear end won't be quite as stiff as I'd hoped but I don't really plan to launch this car during drag races anyway.  Perhaps I've simply made this too hard on myself and it's time to just dial it back a bit and focus on getting the car back together.  It's clear that I'll never be satisfied with the parts I buy...

Tomorrow will be a dry fit of the parts for the subframe - to see if there are any other issues to figure out.  I won't be surprised if there's at least a handful of problems to resolve before this can be put together completely.

Thursday, October 25, 2018

Go forward slowly, it's not a race to the end

Out of absolute boredom and morbid curiousity - I went out to the garage and decided to get something done on the car - no matter how small or insignificant.

It started out with chasing the threads on the captive nuts for the body to pan - every one of them has great threads and they were fairly clean.  I used a pan bolt coated with anti-seize in the hopes that it'll be a good preventive measure.

I then moved on to a bit of very minor body work to clean up some bent sheet metal at the bottom of the body.  I know jack shit about body work but I was able to do a rather nice job straightening out the bent metal.  I'm happy with the result of my ignorant progress.

Motivated by those two 'wins', I decided to test fit the pan to the body - to check if all of the pan holes mate up to the body.  If they did - I'd sort the steel brake lines and get the pan installed.

TL:DR - that didn't happen.
 I got the pan under the body and loosely mounted the front M10 bolts (2 of the 4) and two of the rear body to pan bolts.  The two rear-most captive nuts are from the original pan and the front four bolts are also part of the original pan - using those to center the pan on the body, I then inspected the remaining holes for alignment.

The four interior bolts under the back seat are also from the original pan - those holes line up just fine.  So - the rear six bolt holes and the four up front line up.  The rest of the holes are varying degrees of 'not right' and will require some modification to allow the body to be mounted to the body.
 Most of the holes on the left side of the car are off just slightly but they'll require opening up the hole to get a bolt to mount properly.

This is a collage of blurry photos showing the pan to body alignment with regard to the holes on the left side of the car.  Two of the nine holes line up.  The remainder require what I'd consider a minor amount of ovaling to get a proper fit.

Turns out, it's rather hard to get non-blurry photos of the underside of a car in a garage with overhead lighting.
Here's the right side from rear to front - much worse in terms of photo quality and hole alignment.

The guy who did the work said he used a jig to align the pans to the tunnel - he's communicated that he will check the jig against a Type 3 in his shop and then bring it to my house to check against the pan and my car.  It's entirely possible that there's a slight variation in the pan - although I wouldn't expect a large variance because these cars were mass produced and had to fit within a tolerance.  Either his jig is tweaked or my car is tweaked...I'm hoping that it's his jig and not my car.

In other news:  I called FedHill yesterday to talk about brake lines.  Tim was super helpful and eased my mind a little regarding the failure to properly flare the NiCopp line.  He said that it's typically very thin and hard to flare with good results because of the varying quality of the product.  I inquired about renting his flaring tool and buying Cunifer brake line - he's all out of rental tools so I have been put on a wait list.  I'll give the brake line one more shot before I default to the steel line just to get the car done...although now that I have a bit of modification to do - I may not be ready for brake lines anytime soon.

Speaking of brakes - I'm pretty sure I've chased down the calipers and pads that CSP uses in their disc brake kits.  The fronts are from a 1996 Pontiac LeMans/Daihatsu and the rears are from a 1996 VW Jetta 2.0L.  Having this information should make replacing the calipers and pads a less expensive venture in the future.  I've been contemplating painting the calipers so they don't continue to corrode - I think that decision will depend on how long this car is out of commission while the pan and subframe are fixed up properly.

I'm not sure when I'll get back to working on the car again - I'm just going to do it when the feeling strikes me.  At least now the pan is attached to the body so it's one less thing in the garage.

That's all for now.

Friday, October 12, 2018

The winning streak continues

There's been a little bit of progress and a lot of setbacks.

The left front brake line - bent from a pre-made line to work with the space.  Not ideal but it'll work.
The right front brake line - bent from a pre-made line to work with the space.  Again, not perfect but it'll work.
Left rear line that I made from a longer piece - decent result given the shit design of the mount for the T by Volkswagen.
Right rear line that I made from a longer piece - another decent result that I can live with.
A few days ago - I bought some NiCopp brake line with the goal of making my own lines and having the corrosion resistance of copper lines with stainless nuts.  I'd run into the issue of not being able to get a decent flare out of the copper line.  I tried two pieces ($30 spent to experiment) and, after about 30 attempts of various form, preparation, etc. - I yielded exactly ZERO usable flares - in spite of the fact that this tool cost over $200 and I religiously followed the instructions.

Then, today, while working on another practice run - the tool simply broke.  The up side is that I get to return it for a full refund and I'll be returning the spool of copper line that I bought but didn't open/use.  That'll put $300 back into my pocket.

I packed up the tools tonight and collected the parts and put them in boxes.  I'll finish getting the garage ready for Winter and leave the car idle for the next several months.  I need to 'have a think' about what I have put into this project, what I hope to get out of it and whether I want to continue.  It'd be a shit time to decide to get out but I passed the 'good point' a long time ago.
I've, again, had quite a disappointing level of work done for the money I've spent.  Parts don't fit where they should, people don't do work they say that they will.  It's getting really fucking old.  It's a waste of time, effort and money.  I wonder if I'm masochist enough to continue.

Tuesday, October 9, 2018

You just have to trust your own madness

I picked up the powder coated trailing arms this morning - the cost was far more reasonable than I expected.

Overall - they look good.  The inner bearing areas need a little work but that's to be expected with anything that's been through sandblasting and is a surface that's had grease on it.
One of the bump stop mounts that was replaced was welded in off center - so this one will be in the 'sell' pile.  I just don't have the patience to deal with getting this fixed and re-powder coated again.  It's a one hour ride out and a one hour ride back.  To fix something that I paid to have done the right way the first time.

I think I'll be able to find a set I can use for the car and just move forward.  The rest of the stuff will be sold off or put into a storage bin.
The rubber I found at McMaster Carr arrived and I spent a little time working on cutting pieces from it.  I cut three out and they're in 'okay' shape.  I'd like to hone my technique a bit to see if I can get a better looking pair out of it.  That's shelved for a time when I have patience and time to allocate.
The brake line tool that I bought - I've spent some time working with this to test out my capacity to learn how to use it.  After a few failures to follow directions (and get usable pieces) - I was able to get a few really nice looking bubble flares from cut up pieces of the brake line that I bought from ISP a few years ago.  All of the brake line that I bought from ISP was either too long or too short so it was cut up and used for learning purposes.

I bought some NiCopp line locally and will get back to this in a few days.  I'm still hoping to have the brake line done by the end of the week but that's starting to sound ambitious given all of the other stuff going on this week.  I may switch gears and try to dry fit the pan to see how well the hardware holes line up between the pan and body before I get too many things installed on the pan.

I'm reaching a point in this process where I may have to take a very large step back from this car project for a while.  The stepping off point will be determined if I get through the brake line installation in the next week.  I may just stop working on it altogether - stuff it in the back of the garage and leave it all there until I feel like working on it again.  It's a hobby - it should be a source of enjoyment and engagement.  All it has been for the last four months is a source of stress and aggravation (and a horrible investment).  I'm not getting enjoyment, satisfaction or accomplishment out of this project and I may need to step back and figure out if that's due to other factors in life or if it's a direct result of this hobby.  I suspect it's a bit of both and the solution isn't going to come easily or from one place.

Friday, October 5, 2018

Those who do not move, do not notice their chains

I went out to the sandblasting/powder coating shop and determined what they need to do next.  Larry and I figured that it's possible to get three good sets of trailing arms out of what I had - a couple of bump stop cups would be replaced and one brake bracket would be swapped from a spare arm.  Some time next week - I'll get all three sets back with the axles - all powder coated and ready to go.  From there - I'll decide what to keep and what to sell.
I test fit the rear seat on the brackets and it fits just fine - it's a minor thing but it's no longer a concern.

So - it looks like I'll be on the hunt for that early right side kick panel - or I can just install the late left side that I still have and call it a day.  I'll start looking now just in case I'm able to find one.
After the shift rod and new shift rod bushing were installed - I started on the rear brake lines and quickly ran into trouble.

The lines that I ordered from ISP are too long - in spite of the fact that they came with the correct part number on a tag - they simply don't fit as the original parts did.
The main line from front to rear was ordered from another supplier and it's probably 2' too long.  I started at the rear of the car to deal with the bends and curves and I'm overall fairly happy with how it turned out.
 I matched the curvature of the original lines as much as possible with the new lines but they don't fit - they're either too long or too short.  What's the point of putting a fucking part number on them if they're not correct?

I was able to dig up an original old style grommet for the brake line to go through the pan and after some greasing - the line and nut went right through without any issues.  When I tear this car apart again in the future - I'm going to move the mount for the "T" so that the line comes out of the pan straight.  Doing this will eliminate a few awkward bends in the line and bring the right side brake line closer to the pan in the process by reducing the projection of the loop.  I don't know why Volkswagen didn't do this from the start because there's plenty of room to make it simpler in design and eventual replacement.
The right side line supplied by ISP is too short by about an inch.  I had a couple of other lines that were slightly longer but they turned out to be too long.

After a little bit of searching and agonizing, I decided to buy a proper bubble flare tool so that I can shorten all of the lines that are too long and eliminate the stress of buying pre-made lines and fucking them up - only to have to buy them again.  Now I can simply buy a roll of line (or longer lines) and make the lines to the length I require.  I'm going to wind up having more installed on the pan when it's mated to the body by doing this but I'll at least know that the brake lines are the proper length and I think it'll be easier to deal with before the pan and body are together.  I can also ensure that all of the brake lines are of the same material and finish.
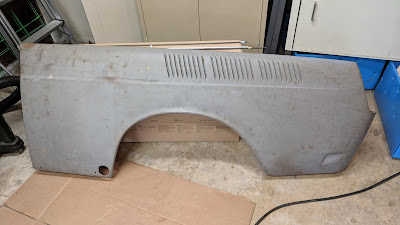
The NOS rear fenders I bought arrived at the FedEx terminal today and I went over to pick them up.  Overall, they're super nice - no trim holes (N model fenders, I'm guessing) but that's a minor issue to resolve later.  They're clean, straight and in great shape!
These will save me a ton of money in body work to fix the rear fenders that are on the car - both of which are folded up near the bottom of the airbox.

Thursday, September 27, 2018

Mediocre at best

The pan and subframe arrived last night.  I looked it over quickly - wrote the check and closed the garage door.  This morning, I opened the garage and took a longer look at it.

First thing I noticed is that the paint is very inconsistently applied.  There was some discussion over the last week or so about how the paint was hard to work with and the results weren't perfect.  I didn't anticipate just how 'not perfect' it would be.  Some areas are smooth and have a slight shine while others are rough and have a flat appearance.

It's far from perfect - I know that KBS lays down well because it's been used on prior projects.  I don't have another $700 to spend to sandblast it and repaint it so I'm just going to leave it alone and move forward.  Disappointing.
The left side of the kick panel retained the proper early pressing with metal tube.  They were able to clean up and retain the original bracket - although it's not welded to the floor quite as well as I expected - it's not going anywhere.
 The right side of the kick panel was completely replaced by a later version - made obvious by the lack of the metal tube to guide the wire for the flap (they use a plastic tube that fits into the clips) and the capture nut for the relay at the top near the top of the bracket (which was also retained).

I have yet to test fit the back seat bottom to the two brackets - that'll get done tomorrow.
We discussed removing the nails from the original seal - none of which were removed.
Removing the dents in the front panel was also discussed - but it was not done.  In fact, I think a dent was added to this part.  I will have to bend it back into place so that I can mount the front panel over the pedal assembly.
The small parts are very inconsistently painted - They were sandblasted and should have been easy to clean and paint but the result is poor at best.  Rough to the touch, not smooth, and there are (somehow) paint runs in a few places.
The reinforcement piece is NOS and the finish isn't great.  It's on the bottom of the car and won't be seen - so I'm just going to move forward.  If I weren't already horribly disappointed with this car and the hobby - I'd fix it.  But I simply want to put the car back together because I'm tired of looking at the pieces strewn about the garage.
The master cylinder skid plate feels like leather - not sure how that was accomplished but here it is.
The subframe looks okay - but the kafer brace bars are missing.  I know we talked about it and photos of what I wanted were sent but it didn't happen.
It's doubtful that I'll need to install those additional bracing pieces but I guess I'll know after a couple of drives once it's all back together.
I spent 45 minutes cleaning out the tunnel - masked it and used a cavity coater inside.
The plan for today was to get the cavity coater in the tunnel and replace the shift rod and bushing - but this new bushing that broke before being installed delayed the shift rod installation until at least tomorrow.

A local parts store is going to have one tomorrow so I'll try to get it done once I pick it up.
 I moved the subframe around a little and heard some rattling inside.  I quickly realized that some of the pieces that were cut off of the subframe wound up inside the subframe.  There's one piece that won't come out - I may epoxy it into place so it doesn't rattle around because I cannot get it out.
This is the pile of stuff that I was able to fish out of the subframe.  Seems like a rather simple thing that should have been checked before being closed up - but maybe I'm expecting too much.

The job seems to have been rushed - which is kind of hard to believe given that it's over 6 weeks late and half of the work requested on the subframe wasn't done.

I could have rejected the work when I realized that it wasn't right - but my desire for perfect is overridden by my desire to just get this car back together.  The whole thing has been an exercise in masochism that - quite honestly - I should have avoided altogether.  I'm over the whole experience - not just because I accepted work that should have been rejected but because it's the level of work that's consistently delivered and I'd simply be rejecting 90% of the work that's been farmed out.

Tomorrow - I'm heading back out to the sandblasting shop to see what the IRS trailing arms look like and decide what to do with the pieces so that I can continue moving forward.  Once they're done - I will only be waiting on the spring plates.