Monday, October 30, 2017

Speedometer and lighting updates

Found a decent speedometer on TheSamba.  I'll probably just clean it up and install it for now - when the car is down for restoration - it'll get sent out for restoration as well.

The front turn indicator LEDs came in today and I got those installed.  The other few parts haven't yet arrived so I'm going to work around that and see if I can get some of this 'punch list' of things done in the meantime.  I did some reading up on the tuning of Weber 40 IDFs and hope that most of it applies to these clones.

I should have the dash bulb issue resolved tomorrow (I hope) so I can put the gauge back into the dash.

I bought some LED headlights - which will give me something to do with the front end.  I should be done with lighting for a while after this is completed.

Also sold a few parts - always nice to get parts to people who can use them vs. having them sit in my garage.

Friday, October 27, 2017

Nigel hit the open road today...

Today was the day after all...I drove around for about 15 minutes to get a feel for the car and see if there was anything 'off'.  Everything seems to be okay - other than my manual transmission skills which are rusty after months of driving an automatic.  I might tweak the clutch cable just slightly to bring the clutch closer to initial pedal input.  Actually, the idle is a touch high and the carburetors need to be dialed in a little bit - then it'll be golden.

Let's recap the day, shall we?  Bright and early this morning, I filled the transaxle with gear oil to replace the amount that I lost while swapping nose cones and then adjusted the clutch pedal travel.  Once that was completed, I moved on to the brake bleeding process - which was very simple because it's all disc brakes AND only the rear section had leaked out.  I double checked the fronts and they were in good shape.  Nice firm pedal with very little travel.

I moved inside and fixed the seat belts (didn't install the rubber mat due to temperature), installed the driver's seat and connected the battery.  Next up was the rear hatch seal - I decided to use the ISP seal that I bought because it's been literal decades since I've installed a seal and that wound up being a good choice.  The ISP seal doesn't have molded corners so it fits like shit in the corners - but seems to be okay in the flat areas.  Keeps the stench out of the car which is what I'm primarily concerned with at this point.  Installed the lower inside seal and that task was complete.  I'll put the other seat in tonight/tomorrow and install the safety relay (just connecting a few wires).

The dash light issue wound up being an LED that has incorrect polarity - I ordered two correct bulbs and an alternator light as well.  One way or another, I'll get the LED thing situated.  Once I find the correct rivets and rivet gun, I'll tackle the independent flashing in the gauge cluster.

I'm now on the hunt for a trip speedometer in MPH...so there is some minor additional wiring to be done in the dash but not a whole lot.

The camber compensator is still on the car - somehow, it's settled into the correct position so I'm going to leave it alone for now.  If I hear any odd noises or it causes any problems, I'll take it off.

Now I just have to wait for parts to arrive so I can finish up a few loose ends. It's supposed to rain tomorrow so it'll be Sunday or Monday before I get back into the car for another drive.

Thursday, October 26, 2017

Getting closer...

 A little bit ahead of schedule - I got the electric fuel pump installed and started the car.

I didn't drive it anywhere because I skipped the brake bleeding process to get the car started...so I'll return to the brakes tomorrow morning.

I have a few other things to get back on the car before I can drive it.  I still expect to be able to drive the car tomorrow.
A very short video of the functional engine.  Not terribly exciting but here it is.

Tomorrow morning will have the brake bleed process completed, the seat belts installed, the floor mats installed, the safety relay installed, the rear hatch seal and, hopefully, the last delivery will arrive and I'll have the new spark plug wires so I can put the engine lid back on.

I received a few of my wayward parts via UPS/FedEx and USPS today...I found thinner axle flange gaskets without looking for them via FCP Euro.  If I'd had them when I was doing the axles, I could have used two gaskets per side.  The axles will loosen up a little through use and I'm not terribly concerned at this point.

I've also decided to remove the camber compensator because the way it's designed doesn't make any sense - it'll eventually shift slightly and just bash into its other half, making all kinds of noise and eventually damaging itself.  I may, at a later date, alter the design slightly, or just run without one.

It'll be nice to take this car out for a drive once it's all dialed in...then I'll get to start working on minor upgrades - like real seatbelts for the front and rear seats.

Wednesday, October 25, 2017

Tiny steps in the right direction

Today was a small progress kind of day.  I got the exhaust installed (still not happy with the way it fits), finished up some wiring, cleaned up the fuel pump mount and got it painted.  I started to dig into the wiring for the safety relay and the fuel pump and it seems to be pretty straightforward and simple so I'm not sweating it.


I installed the NOS EMPI camber compensator but I'm not sure I like the way it sits - I'll reserve judgment for the final review when the car is on the ground.  Something about the way the two pieces interact that just seems weird because they're not connected at all - just bump into one another once in a while...what keeps the bar from moving out of place?  Yeah, nothing...seems strange.


I've had these instructions for years - I've had the part for years as well...all this time I've been too dense to realize that the two pieces are not connected - maybe I'm just too accustomed to the later style that mounts to the transmission housing.


I'm hoping to get the brakes bled tomorrow, along with shifter/clutch adjustment, get the fuel pump installed and potentially get the wiring sorted out.  Once that's done, I'll only have a handful of things left before I can start/drive the car. 

I ordered new plug wires with 90º boots, more electrical connections for all of my wiring and a few spare parts that have been consumed over the past week.  And in a moment of OCD, I organized my electrical connections into a new box - only to discover that I actually need two of these.  Far easier than individual plastic bags.

I tried, again, to mock up the '71 only fuse box only to discover that it isn't going to work - by a long shot.  The location of the relays on the fuse box and the back of the push button assembly prevent the two from working together...so I'll have to come up with a new plan for the relays.  I may just cut the fuse box part off and use the relay mount part - or maybe I should try to find a broken one before I do that since I spent hard earned money on this one.  Kind of a bummer but not all that unexpected.  On the other hand, I didn't have to tear my existing fuse box apart to figure this out so it's a 'win' in spite of being a 'loss', I guess.

Tuesday, October 24, 2017

The return of productivity...

Started off the morning by going out to a local fastener shop and trying to procure the pieces I need...I was about 75% successful.  Successful enough that I was able to keep going.

A few miles down the road, I went to Northern Tool and bought this new jack.  It's about twice the size of the old jack and lifts higher (which helped a LOT later in the day).
 Got the hockey stick swapped, nose cone installed and mounted up to the sub frame.  At the point when I took this picture, I hadn't connected the axles to the spring plates because I wanted to be 100% sure that the shifting issue was resolved.  Once the subframe was installed and I could find all 5 gears, I proceeded with the rest of my installation work.

I wound up having to remove the shocks because they were getting in the way.
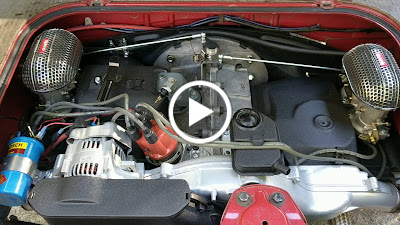
 This is where the day ended - hockey stick swapped, nose cone installed, transmission installed in the subframe - which was then mounted to the pan, installed the engine, connected cables, wires, etc.

I have to install the exhaust, adjust the clutch cable, tighten the axle nuts, add more gear oil (coming tomorrow), adjust the parking brake and a few other little things.
Sure doesn't look like much but there's a lot of progress in this picture.  Having two jacks helped a lot with getting things back to where they belong.  I may try to rebuild the HF jack when I run out of other stuff to do because it's a good size and works well with the furniture carts that I have.

I will probably put the rubber mats back in the car since they didn't sell and I likely cannot ship them to anyone.  They'll go back in once I'm 100% sure I'm done screwing around with anything that would involve removing them.
 I was able to shift the engine slightly to the right and get a tiny bit more clearance for the left hand carburetor air filter.

I am going to need to source some custom plug wires with 90º boots to replace the bug wires that were installed on my engine by the builder.  I've also begun the search for some nice original Webers to replace these clones.
I cleaned up the 71 only fuse box with metal cleaner and vinegar, then rinsed it in water and dried it out.

I have a few pieces to acquire before I can swap the fuse box so I'm going to back burner this one until I've got the other stuff worked out.

Tomorrow is a short day for working on the car but I'm going to try to get the fuel pump mount finished and prepared for install.  I'm going to have to paint it so I don't think it'll get installed but I've got plenty of other things to do to work around it.

The goal is to start/drive the car by Friday.

Saturday, October 21, 2017

Square two

I had a couple of hours tonight and figured I'd see if I could pull the sub frame with the engine.  After removing all of the hardware holding it in place and lowering it on the wheels, removing the exhaust and jacking up the car - I realized that it wasn't coming out in one piece for two reasons.  Reason #1: I was using the jack at one of the locations I'd need a jack stand.  Reason #2: I wouldn't be able to jack the car up high enough to remove the complete sub frame - even if I removed the wheels and put the rotors on plywood.  So I moved on to an alternate plan.  After 20 minutes of wrestling with the now loose sub frame/transmission/engine combo, I got the engine free of the transmission and rested it on a cart.  The idea was that I could leave the engine under the car and work the sub frame out around the engine and the body...sounds a lot easier than it actually was and I'm not sure I'd do it that way again.  I've learned quite a bit about how not to do things the next time around by working on this car.

Not quite back to square 1 but this is a substantial step backward nonetheless.  I'm saving the rest of this for Monday.  I hope I can get the nose cone and hockey stick swapped without removing the axles from the spring plates but I'll cross that bridge when I get to it.

I may also try to test out the 71 fuse box again - I did a test fit of the relays and they all fit in it so I'm hoping that I can figure out how to make it work - I think it'll clean up the underside of the dash quite a bit and give me a good place to mount the relays without making more holes in the body.

I've also worked out a headlight upgrade and a potential solution for music if/when I get to that point with my car...I think it's a bit premature because I'm a couple of years out on music/restoration.

Friday, October 20, 2017

There's always tomorrow!

Well, the sub frame is good to come out once I get the time to do it.  The plan is to jack up the car to clear the engine, put my two carts underneath the assembly, disconnect the last two bolts and drop it back on the ground on the rims and roll it out.

I am pretty sure I'll have to pull the transmission out of the sub frame and disconnect the axles to make room to swap the hockey stick.  I haven't yet decided if I'm going to pull the engine or leave them mated.  Either way, it's going back into the car the way it came out - all in one piece.
In addition to preparing for the hockey stick swap, I ran the power wire for the electric fuel pump.  I marked up the mounting plate for further grinding/filing but put that on the table so that I could meet up with a couple of local VW friends to swap parts and socialize.  It was a good decision to hang out with a couple of cool people instead of swearing at my car for a couple of hours.  I can get back to doing that tomorrow.

I think I've got a pretty good schematic for wiring up the fuel pump and the safety relay - keeping all of the wiring under the dash and minimizing the connections as well.

Tomorrow is another day.

Eh, maybe I'll wait until Monday.

Thursday, October 19, 2017

...when you didn't get what you wanted

Started the day off with great productivity - pulled both rear brake hubs, removed the damaged o-rings, replaced them with new ones, ensured that they were not being crushed and put it back together.

Filled the transmission with oil, hooked up the parking brakes, finished the axle boot installation, installed the bellows boot, cleaned up some wiring in the engine bay, installed the tachometer, started making the bracket for the fuel pump and installed the shifter.

I tried to run the transmission through the gears to align the shifter properly and immediately noticed that something was 'off'.  I could find 3rd and 4th but nothing else.  I ran out of time to work on the car but later contacted a local VW friend to ask if there was anything I may have forgotten or need to check...then the topic of hockey sticks came up.  Turns out there are two different styles of hockey stick - I honestly had no clue.  I couldn't figure out why this would matter on a late/non-stock transmission but then the topic of the change in the tunnel (removal of the center heat tube) potentially changing the geometry of the shift rod turned on the light in my head.  What the fuck...

 Early Type 3 hockey stick on the left (113 311 541 A) - goes until end of April 1964 production - aligning with many changes for the Type 3.  One thought is that when the center tunnel heat tube came out, the shift rod geometry changed...and so did the angle of the divot for the coupler.

Late Type 3 hockey stick on the right (311 311 541) - begins with May 1964 production.

If you look real hard, you can just barely tell the difference in where the holes are drilled.
This photo was used to confirm with a local VW friend that my transmission has the wrong hockey stick.

So...I'm going to undo quite a bit of what I did today and pull the whole rear subframe so I can swap out the hockey stick.  I guess I can fix my half-ass coupler seal installation.  The plan is to pull the whole thing, sans tires, if I can get the ass end of the car high enough.  I have a wheeled dolly that I used to pull the 1500 and I'm hoping to replicate that maneuver.  The less I have to move it around, the happier my back will be in the end.

Welp, tomorrow's another day!

Wednesday, October 18, 2017

A tiny update

 A minor victory:  The stock 64 accelerator cable will work.  I had to drill a larger hole to accept the swaged end but that took all of 30 seconds to remedy.

It's nice when something goes 'right'!
The left side of the engine sits a bit high - I'm assuming because of the new mounts.  I could try to loosen the engine mounts and tilt a bit but I'm not sure that would happen/help.

I have yet to try to install the engine lid but I'm fairly confident that it's going to come into contact with the filter.

I'll deal with this part once I've exhausted my current laundry list of items to fix/finish.

Experience is what you get...

 After dropping the engine and doing another text message brainstorming session, I managed to get the engine in the car.

The relocation of the bracket for the oil filter seems to be good - it's barely not touching anything.
 While I was filling the transmission with gear oil, I looked at the bottom of the hubs and noticed that both of the o-rings are crushed and out of the space they're supposed to occupy.

So, I get to pull the hubs and try again.  Good thing I didn't torque the axle nuts down yet.


 Here's the other side - makes the need for removing the hubs much more apparent.

Once I noticed this, I stopped pumping oil into the transmission, sighed, said "fuck" and got out from under the car.

One day, I'm going to win, but that won't be today.
I installed the exhaust but it is fouling the rear apron - granted the rear apron is already super fucked up but this will make noise rubbing together when the engine is started so a remedy needs to be found.  I'll probably loosen the whole thing and try to center it a little better.  I think better/different hardware is going to be needed though - the stuff VS uses is garbage.  In the event there's not enough adjustment left, I'll find a local shop that can weld stainless and have them modify it so that it fits properly.

Just another few things to add to the list of stuff to deal with before I turn the key.

The shocks are installed, I connected the alternator wiring, reoriented the oil pressure switch so the wire would reach it, and I started to fill the transmission with oil (which will now leak out when I pull the hubs) but I've run out of time for today.  I'll try again tomorrow.

Once I'm done monkey fucking around with this stuff, I'll install the camber stop, the sled tins and the industrial tins - I'm saving that for dead last because it's a lot easier to work on things without those parts installed.

Tuesday, October 17, 2017

Horseshoes and hand grenades...*almost*

 After a late start, I was able to gain some momentum - the brakes were installed, axle boots were started and I decided to attempt to install the engine.

I ran into a few minor issues early on: The oil filter bracket needed to be moved to a different mount hole because it was rubbing on the side of the engine bay.  The exhaust was rubbing against the rear apron (which is bent to absolute shit, btw) so that was removed.
 Had *just enough* space to open the hatch with the car on jack stands - a lucky break.  Having the hatch open makes it much easier to work on the engine area...and I knew I'd need all the help I could get.  This car hasn't exactly wanted to be back on the road - seems like there's a continuous stream of events that prevent the next step from being completed.
 But as I attempted to install the engine, my luck disappeared.  The engine spins freely and the axles spin freely but they do not engage.  I triple checked to make sure neither was tangled up on anything else - all clear.

When the transmission arrived - I checked the case # to make sure it was a 12 volt case before bothering to start assembly so I knew it wasn't the bell housing...but I checked it anyway.
I had a brainstorming session with a local VW friend and the only thing he was able to identify as a potential cause was that the clutch plate wasn't centered with the pressure plate.  You'd think that with what this thing cost to have built that this simple part would have been guaranteed to be done...yeah.

So tomorrow, I'm going to jack the car up, drop the engine and check the clutch plate.  I hope this simple fix is the issue because I don't have many other ideas - everything is clear, nothing is rubbing/touching where it shouldn't but it just doesn't want to go back together.  Just have to see what tomorrow brings.

As I'm working on this car, I've begun compiling a list of things that I want to change the next time I pull this engine out: AN connections and steel braided lines for the remote oil filter, install the Setrab oil cooler I bought, swap the fuel hose for hard line in the engine bay, figure out a way to bring fresh air into the carburetors via stock inlets (+ the one I add on the left side), angled plug wires at the distributor, etc.


Monday, October 16, 2017

note to self: stop expecting

I made a little progress today - the photo would lead one to believe I made more progress.

I swapped out the rusty front left turn indicator housing with a newer one.  That took about 15 minutes in spite of the missing tab on the housing.  I hope it holds for a while so I don't have to do it again soon.

The rear end was a bit more challenging - I spent over an hour trying to get the shift coupling cover and seal into place...turns out the seal should be installed before the sub frame because the top part of the seal goes OVER the top of the nose cone seal.  So, most of the seal is installed correctly - I'm in no mood to drop the whole sub frame to fix the seal - if the past is any indication, I won't drive this car very much anyway.  Why VW decided to put this under the car within a tiny triangle of the sub frame is beyond me.  They should have remained consistent with the Beetle and made the access panel INSIDE under the rear seat.  Yeah, the VIN is stamped in about the same place as that cover plate would be but seriously...makes no fucking sense.

The hubs are installed (obviously) and I hand torqued the castle nuts - none of the brakes are installed yet.  My back started to indicate that it was done with this process so I stopped before I spend the next week regretting what I've done.  There's always tomorrow.

I found and bought the second sun visor - it'll show up after I have forgotten that I bought it because it's coming from Germany via USPS - which means there's also a good chance my local post office will simply not deliver it.

I have yet to tackle the front fuel pump mounting bracket business...I imagine I can get to that this week.  Perhaps I'll have this car started by the end of the month.  My passion for this hobby is fading so it might sit for a while.  It's on tires and will roll if need be...the rest of this shit will happen as both my enthusiasm and physical self will propel me.

Friday, October 13, 2017

Make measurable progress in reasonable time

This is the one sun visor I received from the recent parts haul and it looked substantially worse before I cleaned it.  I should have taken a 'before' photo but it didn't cross my mind until after I'd cleaned it.

I haven't made any progress toward getting the car to be functional - it is much as it ended last weekend.  I was missing a few hardware pieces and somewhere along the way, I lost nearly all of my motivation to work on the car.  The missing hardware arrived today but I have yet to find my motivation.  In the time that's passed, I've listed a few parts for sale online and worked through my inventory audit of parts.  It's about 95% accurate at this point.  I have two more jars of random hardware to sort through - I'd intended on doing that today and it'll have to wait for Monday now.  I have a few more things to list and sell in the coming days - I'm trying to get down to the parts I either need or want for a bone stock restoration as well as the current set up that I have.  Anything beyond that can be sold so I can slim down the vastness of this collection.

Maybe next week I'll have figured out where my motivation to work on the car has gone and I can rectify that as well.

Sunday, October 8, 2017

Moving forward like an alcoholic tortoise with no sense of direction

 Another four hours of work and the subframe went from the floor to the car.  Ran into additional hardware issues where the book specifies one length but it doesn't fit during the assembly/installation process.

I think the new hardware has thicker washers.  I ran to the local hardware store and bought something that's close enough to get it installed. 

I've ordered the proper hardware online and they should arrive ~ Wednesday.  I've got plenty of other small tasks to work on until that stuff shows up.
 The dust boots for the axles and the shift linkage are all that remains of the subframe install job.  I'm not really looking forward to the linkage access plate replacement job - it's a super tight space and leverage is near non-existent.  Dust boots will go on after I've installed the rear brakes and hubs in a couple of days.  Tomorrow is an 'off' day so it'll be Tuesday or Wednesday before I get to it.
Removed the rear portion of the rubber floor mat to get a better view of the floor pan and to improve access to the front subframe support nut.  These floors are pretty much shot - not a whole lot holding them in place.

I think I've figured out a way to get the electric fuel pump connected with the safety switch without a bunch of extra nonsense.  I have all of the hose, clamps and connectors I'll need on order as well - nothing of quality available around here, unfortunately.

Saturday, October 7, 2017

It's just not meant to be...

This is the result of FIVE HOURS of work.  Looks like it should have taken about an hour to get here...

JB came over and we got to working on the car - pulled the side gears, swapped the fulcrum plates to new ones (less binding) and tried to swap to new thrust washers but that was too tight so it had to be taken apart to swap them with the old ones.  Gaskets went on without too much trouble - used one gasket per side and it's snug.  Got the transmission mounted in the subframe after having to fight with the axles for a bit - did a pretty good job of scratching the shit out of the powder coat in the process.  This is where we stopped - the rear bolts for the spring plates are too short because (I think) the new washers and nuts are thicker than the stock washers.  The spring plates are intended to use 2 30mm bolts and one 35mm bolt.  They're currently using two 35mm bolts and will need one 40-45mm bolt.  I'm hoping that the local hardware store has them in stock so I can continue on tomorrow.  If the subframe makes it into the car tomorrow, I'd call that a 'win'.  I am fairly confident that this car isn't going to be fired up tomorrow - there's way too much to get done in between now and the stopping time tomorrow.

If nothing else - the parts will all be in the same place (on the car) vs. scattered all over the garage so that's a plus.

Friday, October 6, 2017

Uncertainty is the normal state.

Well, after three hours of 'work', things are largely as they were yesterday.  I spent some time this morning cleaning the axle tubes (cleaning off the surface rust, ensuring the sand is gone, etc.) and attempted to fit them to the transmission with the gaskets.  The first issue came when I attempted to fit the axle tubes to the transmission.  The bag of nuts and washers disappeared.  As in, *poof!* fucking gone...after looking around for fifteen minutes, I realized I was running out of time so I took the opportunity to clean and organize the workspace, put away tools, wipe down the counter, and get ready for tomorrow.  Never found the nuts.  I bought new washers and nuts while I was out doing other things.

A couple of hours later, I tried to fit the axle tubes with two gaskets (the standard number per side, according to the Bentley), hand tightened the nuts and the axles tubes were loose.  I pulled the whole assembly apart - thinking something must have been skipped - but, alas, nothing was amiss so I put them back together again using a little more gear oil as the lubricant for assembly.  Down to one gasket and everything fits just fine - but with two gaskets - the axle tube flops around easily.

So, for shits and grins, I called the transaxle shop - gave them the lowdown on what was going on and the response I got was "It should require three gaskets per side, occasionally two.  If you're using one, there's something wrong with the flange or the axle tube."  I explained that this transmission had never been apart until recently and the axle tubes appeared to be straight and the flanges are not warped or bent in any way.  Beyond the initial response and advise on how to seal the gaskets, nothing else was offered, so the call ended.

I took the whole thing apart again - because I was secretly hoping for a shit ton of practice - and put it back together, inspecting everything along the way to make sure nothing was incorrect.  It's kind of hard to fuck this up but I figured I'd give myself the benefit of doubt anyway.  Once again, it all went back in just as it came out - smoothly.  No burrs, no hangs, no issues with assembly.  Only one gasket per side.  I measured the thickness of the gaskets - .03mm each.  The parts book references two gasket thicknesses: .01mm and .02mm.  I am really hoping that I just have thick gaskets and everything is going to be fine once I get it all back together.

So, tomorrow, I'm going to pull it apart one last time, check the whole assembly again, reassemble it and hope that it doesn't just grenade on me the first time I drive the car.  I'm still not terribly motivated to work on this car anymore but it's got to get done at some point - might as well get it done soon.

Thursday, October 5, 2017

It's not the load that breaks you down, it's the way you carry it.

 The fuel tank piece that I ordered a few days ago showed up yesterday - as did the wayward box of parts.

The box of parts was, largely, a disappointment because it was missing parts and some parts were not correct...meaning that, while I gained parts, I wound up with parts I didn't need/want.  There are a few cool parts but, for what was spent, I'm disappointed.
 Today was semi-eventful...I got the axles installed.  I didn't get to finish, however, because I found more sand in the axle tubes - so they got cleaned again.  I'm hoping to have them installed tomorrow with the 3 or so hours that I have to work with.

This is supposed to be the weekend the whole shebang gets installed in the car - I'm doubtful that the car will be functional by Sunday.  If I do somehow succeed - the shitty part is that it's supposed to rain all weekend.  So even if I do get it all in and functional, I can't drive it.  The floor has holes in it and I have no functional wipers...and I don't really want to take the maiden trip in the rain - have something go wrong and have to sit in the rain waiting for roadside assistance to show up.  They're not exactly fast.
One of the last pieces of the puzzle showed up today - a fuel pump controller - it's a safety device to shut off the electric fuel pump in case of a wreck.  There are 5 wires to connect and it's pretty small in size (about 2" x 3" x 1") so it should fit semi-concealed under the dash.

I don't know why but I'm seriously lacking motivation to get this car back together.  I should be stoked to get this thing back together so I can drive it - that is, after all, what I wanted to do a few months ago - but there's a large part of me that simply doesn't give a shit anymore.  It's hard to get things done or search for parts when apathy is the strongest feeling related to this car.

It'll get back together - eventually - if it doesn't happen this weekend.  I just wish I was more enthusiastic about it.