Thursday, July 2, 2015

If you can find a path without obstacles, it probably doesn't lead anywhere

I did a LOT of digging around before I settled on buying lug nut adapters for my current lug nuts.  In addition, I found a company that claims to have the correct lug nuts but I only bought one as a test piece because they don't accept returns.  That test piece will arrive on Monday while the adapters will arrive tomorrow.  If the adapters don't work, I'll hold my figurative breath for the test lug nut on Monday.

In the mean time, I bought a few things...
  • M8x1.25x40mm bolts for the early spindles that were original to Nigel.  They're early drum spindles in that they have 8mm ball joint bolts where the later version uses a 10mm bolt.
  • Two sets of NOS drum spindles due in a couple of weeks from one of my stops in the North East in May.
  • M10x1.5x40mm bolts for the ball joints on the 'normal spindles'.  I bought a few from ISP West as well.  Hopefully, ISP sends me the correct bolts and I'll have a few extras.
  • Bought a set of Hassia fog lights from a Samba member for a decent price - they'll arrive on Monday.
  • Bought an emergency flasher knob from a Samba member in Thailand - it'll show up once I've forgotten about it.
  • Ordered another complete set of front Timken bearings for the next beam build.

In a couple of weeks I'll be sending out the ZV/JCU 4R3 distributor that flash rusted last Fall for a cleaning and rebuild.  The guy who's doing the rebuild is off on vacation and I've spent enough lately so the timing works out quite well.

I sold the red bins from the parts cabinets.  I'm still waiting for the rest of my replacement pieces to finish the cabinets off but they're in pretty good shape now.  No more re-organizations to come...just organized parts waiting for a car to call 'home'.  I think I've run out of distractions - and that's a good thing.

I'm also waiting on fabricated bushings for the front beam.  I bought two complete sets - which means that I can have both beams stripped of their bushings and bearings, cleaned and powder coated in preparation for the bushings.  I'm looking forward to getting both beams rebuilt.  The third beam (on the car currently) will be kept with bearings/bushings and I'll rebuild it after its painted and keep it as a spare.

There have been a lot of parts popping up in the classifieds that I've been tempted to buy but I've resisted...knowing that I either have five of the same thing currently or that I don't really need it.

Monday, June 29, 2015

"Like sands through the hourglass..."

Today's lesson is in lug nuts and customer service.

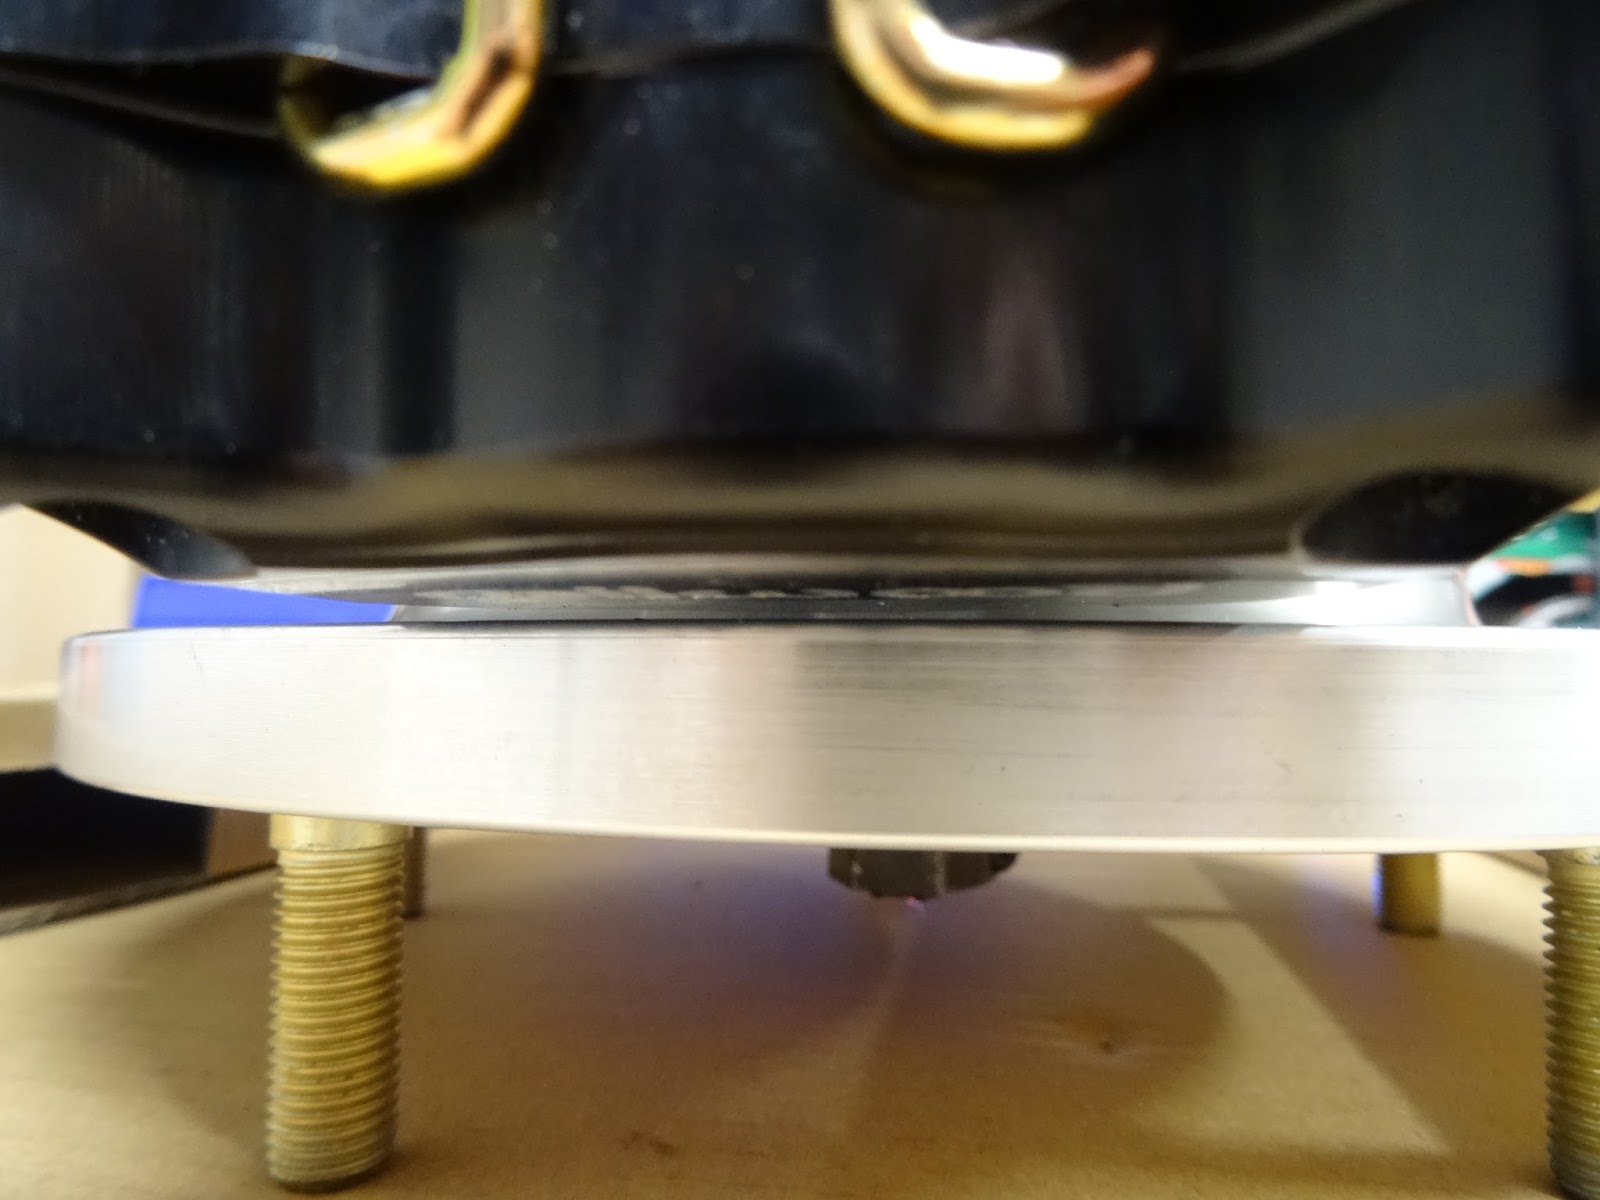
The photo shows the gap between the wheel and the lug nut that's supposed to hold it snug to the hub.

This is where the lesson began.

Type 3 VW wheels are, by definition, in requirement of 'ball seat' lug nuts/bolts.

There are two options when buying this brake kit:  12mm stud and 14mm stud.  I chose the 12mm studs - and that, as I've learned today, turned out to be quite a mistake.  M12x1.5, ball seat lug nuts with a width of 24mm (to properly seat on the wheel) don't fucking exist.  However, had I chosen 14mm studs, the equivalent lug nut is super easy to find.

This is but one example of why I avoid games of 'chance' and 'luck' as a means of keeping money in my pocket and sanity in hand.  I don't play lotto numbers, buy scratch tickets or enter raffles of any kind.  I had 50/50 odds and lost...but I digress.

After spending the better part of the day trying to find the correct lug nuts, I gave up and bought conical seat to ball seat adapters for the existing lug nuts.

The customer service lesson isn't for me although if the company who manufactured the brake kit knew jack shit about customer service, I would have solved the problem a week ago.  Rule #1:  Provide clear installation instructions with clear, not blurry, photos.  Rule #2:  If a customer contacts you via email seeking information - get their name correct when you reply.  Rule #3: Provide useful information when you reply.  You know, suggestions that will actually solve the problem - not just enough information to send the customer on an educational scavenger hunt.

Instead, they chose to provide just enough information to piss me off and make me figure out how to solve the problem myself.  And that took some learning that I wasn't prepared to take on...although I now know more about lug nuts than I hope to ever use.  I could go on Jeopardy! and school the shit out of Ken Jennings if "Lug Nuts" was a theme for a show.

Hindsight: I should have returned the front end to stock and put drum brakes back on the car.

Escaping the rabbit hole...or not.

I thought I was making decent progress until I hit the next obstacle in this process:  the studs don't allow lug nuts to snug the wheel to the hub...so while it appears that I'm close to being finished, I'm not any closer than I was a week ago.

I've tried two different type of lug nuts with similar results.  And, to add insult to injury, the studs are too long to allow the hub caps to be fitted to the wheel.

What.the.actual.fuck.

I've emailed Airkewld.com but haven't heard back about how to resolve the issue.

Still on the fence about keeping the brakes or getting rid of them...I just want to drive the car.  Seems simple enough, yeah?

Thursday, June 25, 2015

Disc brakes, part 3

I built up the driver's side spindle tonight on the bench.

I didn't get it installed but it's pretty well ready to go.  I'm still waiting for brake lines.  I thought I'd found them at CB Performance but a call to them revealed that their web description is incorrect and the hoses they describe (and that I wanted) are not available.

They referred me to Fast Fab but I haven't heard back from them yet.
The 5 washer special, all up close and personal.

Maybe in the West Coast this isn't a big deal...but each one of those washers is another spot for corrosion to start.
Check out that clearance on the brake rotor to the bracket!  Clearly, a flat bracket was much cheaper than designing/manufacturing a proper bracket with a set back.

If I wind up keeping the brakes long term, I'll get proper brackets made if I get around to restoring the car.
A close up shot of the clearance between the brake caliper and the wheel hub/rotor.

Monday, June 22, 2015

If at first you don't succeed, try, try again. Then quit. There's no point in being a damn fool about it.

 After the last post, I emailed Airkewld for an explanation about their instructions and the issues I encountered.  Unexpectedly, they replied fairly quick but the answers were geared toward an idiot and that just pissed me off a little more.  It was very clear that they're either employing a moron to reply or they're used to dealing with morons and have to "Barney it down" for their customers.  This is the only thing I've purchased from them and based on my perception of quality of their product and the design details, I don't think I'll be going back for anything else.  The next brake kit will be from someone else that knows how to make a proper bracket.  It's so easy to get it right that it just irritates the shit out of me that this is where they decided "Aw, fuck it, good enough!  Stick it in the box."

I asked some local contacts about 'next steps' but no one had an answer that was any different than what I suspected:  Short of either buying a different kit or redesigning the bracket that Airkewld created, I had to use the original brackets and washers.  I went to the local Home Depot and found extra bolts and 20 washers.  I used the extra bolts to 'thread' the aluminum holes in the Wilwood calipers and then strip that thread away by intentionally over-tightening them.  I used that technique on both sides of the mounting hole and stripped away 80% of the thread I'd created to open up the holes.  Took about 20 minutes to do all four holes and another 10 minutes to mount the caliper and top ball joint.

I wound up using a total of ten washers per caliper.  I'm not at all happy about using 20 f'ing washers on a brake kit that should be designed to eliminate half-assed inventions.  There is roughly 1 - 2 mm of space between the caliper and the rotor now that it's mounted/centered.  I'm hoping that it won't rub but I won't be the least bit surprised if it does wind up rubbing.

No pictures were taken of the final install on the passenger's side - phone died and the camera decided it doesn't like the humidity in the garage.  I'll see about photos once I get the driver's side installed...or I have time to go back out and take them.

After this bit of fun, I get to figure out the reservoir mounting situation and then bleed the brakes (my favorite thing to do) before I can drive the car.

Saturday, June 20, 2015

Expectation is the mother of all frustration

 I scored some garage time this morning and expected to get the front brakes on the car finally.

I gathered the required parts (now nicely organized in my cabinets) and with tools at hand, I proceeded to install the steering arms, ball joints and caliper brackets.  Looks good, doesn't it?
 I mounted the passenger's side spindle because I can easily access it without moving the car.  The spindle went on without hassle and things were progressing nicely.  I pulled one of the Wilwood calipers out of its box and held it up near where it would be mounted.

This is when I started to wonder about this Airkewld kit.  There's about 3mm of space between the caliper and the rotor.  Not ideal but not the end of the world, right?

I just can't quite wrap my head around 'tight tolerance' on one side and 'a stack of hardware store washers' on the other side.
 Then we have a look at the back side...See the gap between the caliper and the bracket?  It's easily a 1/4" - 3/8" wide and intended to be filled with washers provided by Airkewld - which I didn't realize when I bought the kit because there are no instructions included in the box.  The instructions are online only, vague and reference blurry photos they posted on Facebook.  The instructions have reference numbers to photos that don't exist.

The bolts that are provided are to be mounted in such a way that washers are used to keep the bolt from being driven in too far (and striking the brake rotor).

I'm still thinking that this 'might' be okay.  We're talking about a braking system here and the fewer number of Mickey Mouse adjustments the better, in my opinion.

I'm irritated at this point...A $900 brake kit that's mounted with a handful of washers.  What the fuck?  If this was a $50 lesson, no shits would be given, but that's not the situation.
Ah, the coup de grace!

The hardware they provided doesn't fucking fit the brake caliper.  Yes, I can drill the holes out but that's not the point.  Why didn't they design the fucking thing to go together properly?

If you're going to sell a product for a premium price, make sure your shit works and all of the pieces fit together properly.

I'm really starting to wonder if I should simply exit this hobby.  Sell all of this shit off and go back to mountain biking.  I'm getting really tired of spending so much time accomplishing so little while enjoying nearly nothing in the process.

Wednesday, June 17, 2015

Distractions

After a few attempts at organizing the cabinets with the red bins I bought on eBay, I came to the conclusion that I'd need to buy more.  I didn't want to keep putting money into the cabinets with limited flexibility.  After some searching, I found myself buying a group of Vidmar bins on eBay after negotiations with the seller.  It went better than expected and I wound up with a hell of a deal.
I started grouping the parts by where they belong on the finished vehicle in an effort to comprehend what I've got and how many I've got.

This photo shows the 'front axle' parts in a drawer that's been cleaned up and organized.  There will be additional parts added to the drawer once I've gone through the others and organized properly.

I attempted to organize by part number but that didn't work because I'd have to buy another cabinet.  I realized that I needed a different method of organization so I approached organization by how I'd put the car back together.  Once the parts are organized in a way that makes sense, I'll label each drawer so that I can soothe my anal-retentive organization freak show side.

Some day, I'll get back to putting a car together...

In other news:  The whole family went out to California for a week.  I went to OCTO and the El Prado show and shine in lieu of the Classic.  I didn't find much in the way of parts...so little, in fact, that I didn't take any photos of the parts (4 pieces in total).  I also didn't take very many photos at the shows.  I spent my time conversing with fellow T3 owners at El Prado and, unfortunately, didn't have more time to hang out...seems like I leave a little bit too early each year and miss something.  Maybe next year, I can stick around longer.  There's always next year...maybe I'll have made some progress on Ferris or Nigel by that time.

Sunday, June 7, 2015

A step in the right direction

 The small test batch from the new powder coater were picked up today.  Six steering arms, two sets of drum spindles and the three pieces of an early camber stop, the camber stop spring (not pictured) and the brackets for the disc brakes.
 A super early set of drum spindles (8mm bolts) and a 'regular' early set of drum spindles (10mm bolts).  The 10mm bolt spindles will be getting the disc brake brackets and find their way onto the car - hopefully right after I return from California.  This car being up on jack stands for so long is a bit nuts, especially since I bought it to drive while I finished Ferris.
The three 'rust red' pieces from the camber stop I bought used a couple of years ago.  I can finally put it back together and put it on a car!  The pieces turned out great-nice even coating and no drips or weird markings on them like the previous shop did (wrong).

Overall, I'm very happy with the results and I look forward to doing a little metal work and then dropping the parts off for a proper coating job.  Looks like I found the right place so it's time to start making progress.

 I negotiated with the seller of a hazard light kit that I plan to install on Nigel.  The knob is for a later model year but I think I can use this kit and simply swap the knob and escutcheon for the 66 model version on this switch.  If not, the knob isn't the end of the world.  I'd rather have functional (and easier to install) hazard lights.  I can get tangled up in the knob details later.
The instructions sheet for Type 3 is included.  Should make wiring it up super simple.

I have a Jokon kit for Ferris and a spare single pole switch if I decide to go that route on one of the cars.

Sunday, May 31, 2015

...and who gets the job pushing the knobs?

I located another reputable powder coating operation in the semi-local area.  I established contact and have dropped off the front brake parts for Nigel and the camber compensator parts for Ferris as a first go.  If these parts come back in good condition, I'll send more work his way until I'm able to have a garage full of correctly powder coated, ready to install parts.  I'm now on the hunt to find a paint shop that can correct the fubar'd paint job on the pan for Ferris.  I'd like to get that pan painted and start putting it back together soon.  There are a lot of parts just waiting for assembly and I'm itching to put something together.

I received the parts book that I found on eBay - it's in very nice condition.  It appears to be a first print.  It's not as robust as the others and there are no supplements past #3.  I have yet to find any gaps in the page count.  The cover will be cleaned soon but it's in very nice condition overall.

(UPDATE: Photo of the book now that it's clean)

The rear reflectors/housings from Italy arrived and they're in great shape, although they don't match.  One is SWF manufactured and the other is a Hella.  I wonder what the odds are of finding another SWF to complete the pair...

I'm hoping to get the first round of powder coated parts back before the trip to California...and I'm real hopeful that they're done correctly so that I can get the brakes back on Nigel right when we return from California.

Monday, May 25, 2015

bits and pieces

 I was put in touch with a seller in North Carolina via a contact in Germany about a right side NOS pop out window frame.  Some time had passed and I didn't think that the frame would be available...but I got in contact with the seller today and discovered that it was still for sale.  So I bought it.
I also found another Type 3 parts book.  The cover is dirty but the pages were clean and the dividers appear to be in good shape...it's getting close to time to sell off one of my other books (or at least some of the pages).

Still have the brakes to put back together before Nigel can come out for the summer but I feel like it's do-able and that I'll be able to drive him around a bit before he goes into storage for the winter.  I'm looking forward to driving the old guy around finally!

Tuesday, May 19, 2015

Patience is not simply the ability to wait - it's how we behave while we're waiting.

Made a deal today on a complete set of NOS rear reflector assemblies.  What I was really after are the reflectors themselves but I wound up buying the complete assemblies once the price was negotiated.  It became too good to pass up.  They're coming from Italy so it's likely to be a while before they show up.  Hopefully, they arrive before I go to California.

In addition to this buy; I found NOS screws for the front turn signal lenses from another source.

I'm convinced that if I wait long enough, I can find just about anything.


Sunday, May 3, 2015

NOS Left side pop out frame

Left side NOS pop out frame.  Now the search is on for the right side.

I think that if I can find a complete pair, I'll be able to sell off/recycle the giant pile of spares I've collected in the garage.  I may also drop them off at the local plating shop and see if they can do anything with them prior to bailing out on them.  I'll have to dig them out and oil the screws to see if I can get them apart (the hardest part).

Saturday, May 2, 2015

Sometimes the stories are better than the discoveries

I went on a bit of a parts discovery in the East Coast earlier this week.  I had four destinations on my mental itinerary when I arrived.  The first destination turned out to be a very nice place to stop.  My wife and I spent over two hours with the owner of a little VW shop, trading stories and learning about the local interests.  I found a few nice parts during the stop and later shipped them back home.  The journey was definitely the best part of the experience...I would have been just as happy to have departed with the stories and the interactions and no parts in hand.  They were the bonus to the experience.

The second stop was somewhat of a local legend but it turns out that the owner had passed away two years ago (information traveled too slowly to me apparently) and most of his stuff was sold at auction last year - right around the time I'd originally planned to make this trip.  Terrible timing on my part.  So that destination quickly evaporated - which was VERY unfortunate because I also heard that he had a LOT of Type 3 parts.

The third stop was physically present but the owner was not.  I couldn't get in touch with him so I had to forgo that destination as well.  Frustrating.

The fourth stop didn't happen for various reasons.

A lot of these spots where people have parts stashed away are evaporating and the owners of the remaining parts are more and more unwilling to entertain buyers.  I get it.  It's intrusive, people can be really unpleasant and some transactions just aren't all that worthwhile.  I don't know that I'd entertain someone wanting to dig around in what I've got after I'd spent years amassing my collection.

So, what did I actually buy?

Not pictured:  VGC ivory hood release cable/knob, NOS tail pipe mounting kit, NOS right side heater box (it's in a box on its way home right now) and the stuff shown below.


NOS ATE dual circuit Master Cylinder.
 NOS glow plug for the gas heater.  Not many people need these but not many of these exist.  Very hard to find.
 NOS seat cams.  I now have enough to rebuild two complete seats with NOS cams.  I'm still searching for two more to get a second complete set.
NOS 12v choke.  Last year while tuning the engine for Nigel, the left side choke got stupidly hot and subsequently removed.  I bought this one to replace it.


I've also scored a left side NOS pop out window frame and some other small parts for Nigel.