I guess I should start with the good part - I started my new job and it's a great fit for me. It has all of the things I like and a few new challenges to encourage me to grow professionally - so all around, it's a great thing.
The tile contractor that was supposed to start on Monday - didn't. They called on Sunday to say that they were declining the job because they didn't have a signed contract and took another job the previous day. I had the contract in hand with a deposit to hand over on Monday. But hey, fuck them - this is a good thing. I fixed the drain situation and have looked into getting a prefab drain panel so things will change again real soon.
I've got two quotes - the first one is attractive, the second dude gave me the "I don't want the job" price and I will get another quote Wednesday. Then we will make a decision and get this shit going (I hope). I'm so fucking tired of this bathroom and all of the nonsense that comes with it. I hate the house we bought but I'm going to channel that into making progress somewhere - even if it's not on the house. Which is how I made progress on the car today.
I pulled the exhaust, the engine and the transmission. As soon as I find a box for the transmission, I'll get that moving as well. I mean, I did tell the trans shop that I'd be sending it back - oh, what...a year ago? If I get this box thing figured out - I'll have to reach out and let them know it's coming for real this time.
Or it'll sit on the floor of the garage for another year while I get distracted by other shit.
I've ground the edge down on the spring plates and have to get those sent out for plating work.
While I'm waiting on all of that stuff - I might get back into the wiring stuff that needs to be done. I've also got to figure out how to open up the holes for the body to pan issue. I also need to work out how I'm going to mount the seat belt brackets on the floor. Still lots to do.
Sunday, June 21, 2020
Friday, June 12, 2020
“Strategy equals execution”
I have the strategy but seriously lack the execution.
I had this week off between jobs - the plan, the strategy was to spend at least two of the five days off pulling the engine, the transmission and then package the transmission for shipping to get the case replaced. Grinding down the edge on the spring plates and getting them replated. The other thing I wanted to accomplish was to mark and drill the holes for the seat belts and figure out the hole issues between pan and body.
I accomplished absolutely none of it.
I did, however, find and buy a pair of these gigantic fucking jack stands to hold up the body when I get to the point of pulling the pan to fix the mounting holes, the rear brake T and the seat belt brackets.
I made plans. I made no progress.
This is why I've made no progress. The bathroom in the house I bought a year ago - this bathroom has been under some form of construction for nearly a year. This bathroom has been a royal pain in my ass for a wide variety of reasons. It was 'remodeled' when we bought the house and after we discovered a plumbing issue, we cut a hole in the ceiling of the room below to access the P trap of the shower - discovering there was no vent pipe for the shower or toilet. Then we discovered that the floor joists were compromised with giant holes for the toilet that didn't work correctly. In the end, that bathroom and the 1/2 bath downstairs AND the ceiling of the living room was torn out, an architect and structural engineer were hired, things were fixed and we started to see the light at the end of the tunnel. Time was a commodity that I could spend with some flexibility.
Then, right before we reached the finish line, the contractor shit the bed, and things started going wrong. Very quickly, things went wrong. Other contractors came in and reported that they couldn't do their part because of issues with the new bathroom. As a result of a few small 'red flags' and a sense that those red flags were hiding more sinister shit because the contractor started making excuses for his work - I spent most of my 'free' week removing most of his work, fixing plumbing and framing shortcuts that affected the final outcome of the project. I'm livid that I had to remove work that was supposed to be finished but I'm glad I did because I found a lot of janky shit that had to be fixed. I will never trust another contractor doing work at my house as a result of this fuckery.
After a lot of research, agonizing, questioning and waiting - a new tile contractor is scheduled to start on Monday, and after several conversations, I'm cautiously optimistic they'll get it right. Monday is also the day I start a new job - a job that is going to require a lot more of my mental attention and physical presence. Odds are, I won't have a lot of time to work on the car with all of the other things coming together in this 'perfect storm'. I'm going to attempt to spend a couple of hours per week getting things knocked off this list of shit to do so I can drive the car again but I can't hold my breath hoping that it'll happen.
I had this week off between jobs - the plan, the strategy was to spend at least two of the five days off pulling the engine, the transmission and then package the transmission for shipping to get the case replaced. Grinding down the edge on the spring plates and getting them replated. The other thing I wanted to accomplish was to mark and drill the holes for the seat belts and figure out the hole issues between pan and body.
I accomplished absolutely none of it.
I did, however, find and buy a pair of these gigantic fucking jack stands to hold up the body when I get to the point of pulling the pan to fix the mounting holes, the rear brake T and the seat belt brackets.
I made plans. I made no progress.
This is why I've made no progress. The bathroom in the house I bought a year ago - this bathroom has been under some form of construction for nearly a year. This bathroom has been a royal pain in my ass for a wide variety of reasons. It was 'remodeled' when we bought the house and after we discovered a plumbing issue, we cut a hole in the ceiling of the room below to access the P trap of the shower - discovering there was no vent pipe for the shower or toilet. Then we discovered that the floor joists were compromised with giant holes for the toilet that didn't work correctly. In the end, that bathroom and the 1/2 bath downstairs AND the ceiling of the living room was torn out, an architect and structural engineer were hired, things were fixed and we started to see the light at the end of the tunnel. Time was a commodity that I could spend with some flexibility.
Then, right before we reached the finish line, the contractor shit the bed, and things started going wrong. Very quickly, things went wrong. Other contractors came in and reported that they couldn't do their part because of issues with the new bathroom. As a result of a few small 'red flags' and a sense that those red flags were hiding more sinister shit because the contractor started making excuses for his work - I spent most of my 'free' week removing most of his work, fixing plumbing and framing shortcuts that affected the final outcome of the project. I'm livid that I had to remove work that was supposed to be finished but I'm glad I did because I found a lot of janky shit that had to be fixed. I will never trust another contractor doing work at my house as a result of this fuckery.
After a lot of research, agonizing, questioning and waiting - a new tile contractor is scheduled to start on Monday, and after several conversations, I'm cautiously optimistic they'll get it right. Monday is also the day I start a new job - a job that is going to require a lot more of my mental attention and physical presence. Odds are, I won't have a lot of time to work on the car with all of the other things coming together in this 'perfect storm'. I'm going to attempt to spend a couple of hours per week getting things knocked off this list of shit to do so I can drive the car again but I can't hold my breath hoping that it'll happen.
Thursday, May 28, 2020
"People run from rain but sit in bathtubs full of water"
The brackets arrived today - after a brief tour of the US because FedEx decided an indirect route was better (Nevada > Oregon > Tennessee > Illinois).
First impression: Super nice packaging - both the outer box, the inner packaging and the information they send along with the parts.
Excited to open the brackets and test them out for fit!
Ah, well...shit. Something didn't translate and the holes don't line up. Then I realize that I didn't check the dimensions of the brackets before I submitted the file to be cut.
That's 100% my fault.
I got super excited and shit the bed, basically.
I was so caught up in the idea of finally having a solution for mounting the thermostat/oil filter that I submitted the file without checking it first. Rookie mistake from 'not a rookie'. Some adjustments will be made and a second set will be made - hopefully that set is the 'winner'. Try, try, try until it's right...it's only 'time', right?
In other news - I went ahead and ordered a new set of spring plates from Sway A Way and they arrived today. The welds on this set are significantly better than the first set that I bought years ago. I won't have to grind anything down on the welds but the top edge is going to need some clearance work.
The clearance work isn't that big of a deal because the plating job on these spring plates is just as inconsistent as it was on the set I bought a while back with the shitty welds. See that shiny part and the duller part next to it? That's not a photographic/lighting issue - that's a mediocre plating process.
I'll grind down the one part that's too 'square' and figure out if they're getting painted or replated. Either way, they won't be ready for use for a while. Fixing what should be a 'ready to use' product is super fucking annoying but it's what I've come to expect from everyone making aftermarket parts. Yeah, my silence and accepting their shitty quality makes it 'okay' in the manufacturer's eyes but I can't keep eating return shipping fees just to make a point when I can use that money to move forward. I've got to figure out how to pivot and persevere a lot better than I have in the past. This car has to get put back together. I'm tired of looking at it on jack stands in the garage.
And now that I know I won't be able to use my free week of time to work on the car like I wanted - I'll probably send the calipers and master cylinder out to be reconditioned if the price and turn around are interesting. I can work on my oil cooler mount while I'm waiting for this other stuff to get done. I've got three weeks to make some significant progress on this car - then I start a new job and between that, finishing up the bathroom remodel from hell and getting back to 'normal', I won't have a whole lot of free time for a while. I'm going to try to find small things to accomplish while I'm waiting on the bigger things to be resolved.
First impression: Super nice packaging - both the outer box, the inner packaging and the information they send along with the parts.
Excited to open the brackets and test them out for fit!
Ah, well...shit. Something didn't translate and the holes don't line up. Then I realize that I didn't check the dimensions of the brackets before I submitted the file to be cut.
That's 100% my fault.
I got super excited and shit the bed, basically.
I was so caught up in the idea of finally having a solution for mounting the thermostat/oil filter that I submitted the file without checking it first. Rookie mistake from 'not a rookie'. Some adjustments will be made and a second set will be made - hopefully that set is the 'winner'. Try, try, try until it's right...it's only 'time', right?
In other news - I went ahead and ordered a new set of spring plates from Sway A Way and they arrived today. The welds on this set are significantly better than the first set that I bought years ago. I won't have to grind anything down on the welds but the top edge is going to need some clearance work.
The clearance work isn't that big of a deal because the plating job on these spring plates is just as inconsistent as it was on the set I bought a while back with the shitty welds. See that shiny part and the duller part next to it? That's not a photographic/lighting issue - that's a mediocre plating process.
I'll grind down the one part that's too 'square' and figure out if they're getting painted or replated. Either way, they won't be ready for use for a while. Fixing what should be a 'ready to use' product is super fucking annoying but it's what I've come to expect from everyone making aftermarket parts. Yeah, my silence and accepting their shitty quality makes it 'okay' in the manufacturer's eyes but I can't keep eating return shipping fees just to make a point when I can use that money to move forward. I've got to figure out how to pivot and persevere a lot better than I have in the past. This car has to get put back together. I'm tired of looking at it on jack stands in the garage.
And now that I know I won't be able to use my free week of time to work on the car like I wanted - I'll probably send the calipers and master cylinder out to be reconditioned if the price and turn around are interesting. I can work on my oil cooler mount while I'm waiting for this other stuff to get done. I've got three weeks to make some significant progress on this car - then I start a new job and between that, finishing up the bathroom remodel from hell and getting back to 'normal', I won't have a whole lot of free time for a while. I'm going to try to find small things to accomplish while I'm waiting on the bigger things to be resolved.
Friday, May 22, 2020
"It is not the mountains we conquer, but ourselves."
The brake pads from the 1993 Pontiac LeMans arrived and they're the correct fit for the front calipers.
A few small differences in the pad construction but to be fair, I bought closeout el cheapo pads for $3.
A picture of the back side of both pads (CSP supplied pads on the right).
Stacked back to back - the holes line up.
I installed one set on the caliper and they fit perfectly.
Nice to have a 'win' once in a while!
A few small differences in the pad construction but to be fair, I bought closeout el cheapo pads for $3.
A picture of the back side of both pads (CSP supplied pads on the right).
Stacked back to back - the holes line up.
I installed one set on the caliper and they fit perfectly.
Nice to have a 'win' once in a while!
Wednesday, May 20, 2020
"Failure is not fatal, but failure to change might be."
Not much worthy of photographing happened today - I pulled out the selection of trailing arms, found the best one for the right side and prepped it for installation.
I surveyed the situation for the seat belt installation - I'll be working up some brackets, figure out the final mounting and then drilling some holes. The final installation will require welding brackets to the pan but it shouldn't be terribly complicated.
The AutoCAD drawing for the brackets came back today - and was immediately send to SendCutSend.com for production - the final product should be available late next week. I'd say I'm cautiously optimistic about the final result.
Why the hell is there a picture of a 1993 Pontiac LeMans in this post? Apparently, the front calipers on the CSP brake kit come from a 1993 Pontiac LeMans, among a longer list of cars that were not brought to the US. The miniature Aztek, however, is the only one of these cars sold in the US that I could find. To test this theory - I've ordered a $4 set of brake pads from RockAuto.com to confirm fit - they'll arrive on Friday.
I discovered that the part number for the brake pads is printed on them - that made this process very easy to confirm the correct parts. The rear calipers, based on my Google investigation, are from a 1996 Volkswagen Passat.
I've also started a list of parts to order as I get closer to those tasks. One of the things I've looked into is getting the brake calipers and master cylinder painted or coated to stall corrosion - the front calipers are already suffering and it's only a matter of time before the rears are in the same shape. I'd go with a simple silver or black - colors aren't all that important because they're largely hidden. This offering looks interesting but I'd want to know how this is different from powdercoating them.
I surveyed the situation for the seat belt installation - I'll be working up some brackets, figure out the final mounting and then drilling some holes. The final installation will require welding brackets to the pan but it shouldn't be terribly complicated.
The AutoCAD drawing for the brackets came back today - and was immediately send to SendCutSend.com for production - the final product should be available late next week. I'd say I'm cautiously optimistic about the final result.
Why the hell is there a picture of a 1993 Pontiac LeMans in this post? Apparently, the front calipers on the CSP brake kit come from a 1993 Pontiac LeMans, among a longer list of cars that were not brought to the US. The miniature Aztek, however, is the only one of these cars sold in the US that I could find. To test this theory - I've ordered a $4 set of brake pads from RockAuto.com to confirm fit - they'll arrive on Friday.
I discovered that the part number for the brake pads is printed on them - that made this process very easy to confirm the correct parts. The rear calipers, based on my Google investigation, are from a 1996 Volkswagen Passat.
I've also started a list of parts to order as I get closer to those tasks. One of the things I've looked into is getting the brake calipers and master cylinder painted or coated to stall corrosion - the front calipers are already suffering and it's only a matter of time before the rears are in the same shape. I'd go with a simple silver or black - colors aren't all that important because they're largely hidden. This offering looks interesting but I'd want to know how this is different from powdercoating them.
Monday, May 18, 2020
"Never confuse a single defeat with a final defeat."
Three things were accomplished today with the car.
One of those things was aligning the oil fill tube with the body fill location. The late oil fill tube with the stub pipe to connect to the breather is made differently from the early style that doesn't have the stub pipe. After making too big a deal of the remedy in my head, I grabbed it and pulled in various directions until it lined up with the fill tube.
I've thought about this issue for far longer than it took to fix it.
I took the passenger's side door apart and swapped out the felt between the glass and the wind wing. I'd previously installed the commonly available felt with the red line in it and the window required far too much force to go up and down. With this felt installed, rolling the window up/down requires a thumb and a finger - it's that easy. One more thing to remove from the list of things to do.
Along a similar vein as the oil fill tube, I used a screwdriver with a large shaft and put it in the parking brake tube. I very gently bent it up until I could get the parking brake cable installed. Once I checked it for fit - I moved to the other side and got this shit done.
Another thing I spent way too long thinking about when I should have just tried the simple solution.
If I can get a few things done on this car each week, the list should shrink faster than it grows.
One of those things was aligning the oil fill tube with the body fill location. The late oil fill tube with the stub pipe to connect to the breather is made differently from the early style that doesn't have the stub pipe. After making too big a deal of the remedy in my head, I grabbed it and pulled in various directions until it lined up with the fill tube.
I've thought about this issue for far longer than it took to fix it.
I took the passenger's side door apart and swapped out the felt between the glass and the wind wing. I'd previously installed the commonly available felt with the red line in it and the window required far too much force to go up and down. With this felt installed, rolling the window up/down requires a thumb and a finger - it's that easy. One more thing to remove from the list of things to do.
Along a similar vein as the oil fill tube, I used a screwdriver with a large shaft and put it in the parking brake tube. I very gently bent it up until I could get the parking brake cable installed. Once I checked it for fit - I moved to the other side and got this shit done.
Another thing I spent way too long thinking about when I should have just tried the simple solution.
If I can get a few things done on this car each week, the list should shrink faster than it grows.
Saturday, May 16, 2020
"There are no limits. There are only plateaus, and you must not stay there, you must go beyond them"
Today seemed like a good day to get the torsion bars installed in the subframe - so I took everything apart expecting to put it back together.
I noticed something when I pulled it all apart - sand. While I don't specifically remember cleaning out the cavity when the subframe came back - it is normally something I'd do right away so I never really thought about it - until today.
This is less than 20% of what came out of the cavity after a vigorous cleaning session with a dryer vent brush and the air compressor.
I am confident that it's clean inside but I didn't get much further than this place because I ran out of time - the majority of which was spent driving to Home Depot, standing in line to get in (thanks, COVID-19) and driving home.
The spring plates are beginning to rust through the original coating - both in the places I modified and places I did not. The plan for them is to strip off the zinc coating and paint them.
I pulled the brand new torsion bars out of their box for the second time and discovered the ends were surface rusted - I cleaned the rust off and coated them in grease. I bought them nearly two years ago expecting to have them installed and the car functional in a couple of weeks. The power of good intention and all that...
I went to the Sway A Way website to see if I could get another set of the spring plates using the part numbers stamped into the set I have - the website brings up a completely different part so I sent an email to their customer service contact to find out if alternatives are available. I should have just kept the IRS stock for simplicity's sake but that's not what a car hobby masochist does.
In other news, I contacted CSP and asked about the step on the ID of the brake caliper brackets - they told me that their R&D department explained that the step is intentional for what amounts to an 'interference' fit and that as long as the cover is installed with even force all the way around, it should be fine. This means that I'll have to have everything completely dialed in before fully installing them because they'll be a real bitch to remove. What's odd is that I did not have this issue with the swing axle rear end - the bracket just went on and worked fine.
At some point, I will reach that place where I can do more than work on this for a couple of hours and accomplish very little - there's just too much going on right now to expect more than one or two steps at a time.
I noticed something when I pulled it all apart - sand. While I don't specifically remember cleaning out the cavity when the subframe came back - it is normally something I'd do right away so I never really thought about it - until today.
This is less than 20% of what came out of the cavity after a vigorous cleaning session with a dryer vent brush and the air compressor.
I am confident that it's clean inside but I didn't get much further than this place because I ran out of time - the majority of which was spent driving to Home Depot, standing in line to get in (thanks, COVID-19) and driving home.
The spring plates are beginning to rust through the original coating - both in the places I modified and places I did not. The plan for them is to strip off the zinc coating and paint them.
I pulled the brand new torsion bars out of their box for the second time and discovered the ends were surface rusted - I cleaned the rust off and coated them in grease. I bought them nearly two years ago expecting to have them installed and the car functional in a couple of weeks. The power of good intention and all that...
I went to the Sway A Way website to see if I could get another set of the spring plates using the part numbers stamped into the set I have - the website brings up a completely different part so I sent an email to their customer service contact to find out if alternatives are available. I should have just kept the IRS stock for simplicity's sake but that's not what a car hobby masochist does.
In other news, I contacted CSP and asked about the step on the ID of the brake caliper brackets - they told me that their R&D department explained that the step is intentional for what amounts to an 'interference' fit and that as long as the cover is installed with even force all the way around, it should be fine. This means that I'll have to have everything completely dialed in before fully installing them because they'll be a real bitch to remove. What's odd is that I did not have this issue with the swing axle rear end - the bracket just went on and worked fine.
At some point, I will reach that place where I can do more than work on this for a couple of hours and accomplish very little - there's just too much going on right now to expect more than one or two steps at a time.
Wednesday, May 13, 2020
"I see the world keep moving as I stumble"
While test fitting parts for the IRS rear end - I noticed that the
fit of the CSP rear disc brake caliper mount isn't quite the same as it was
when used on the swing axle rear end (it was flush).
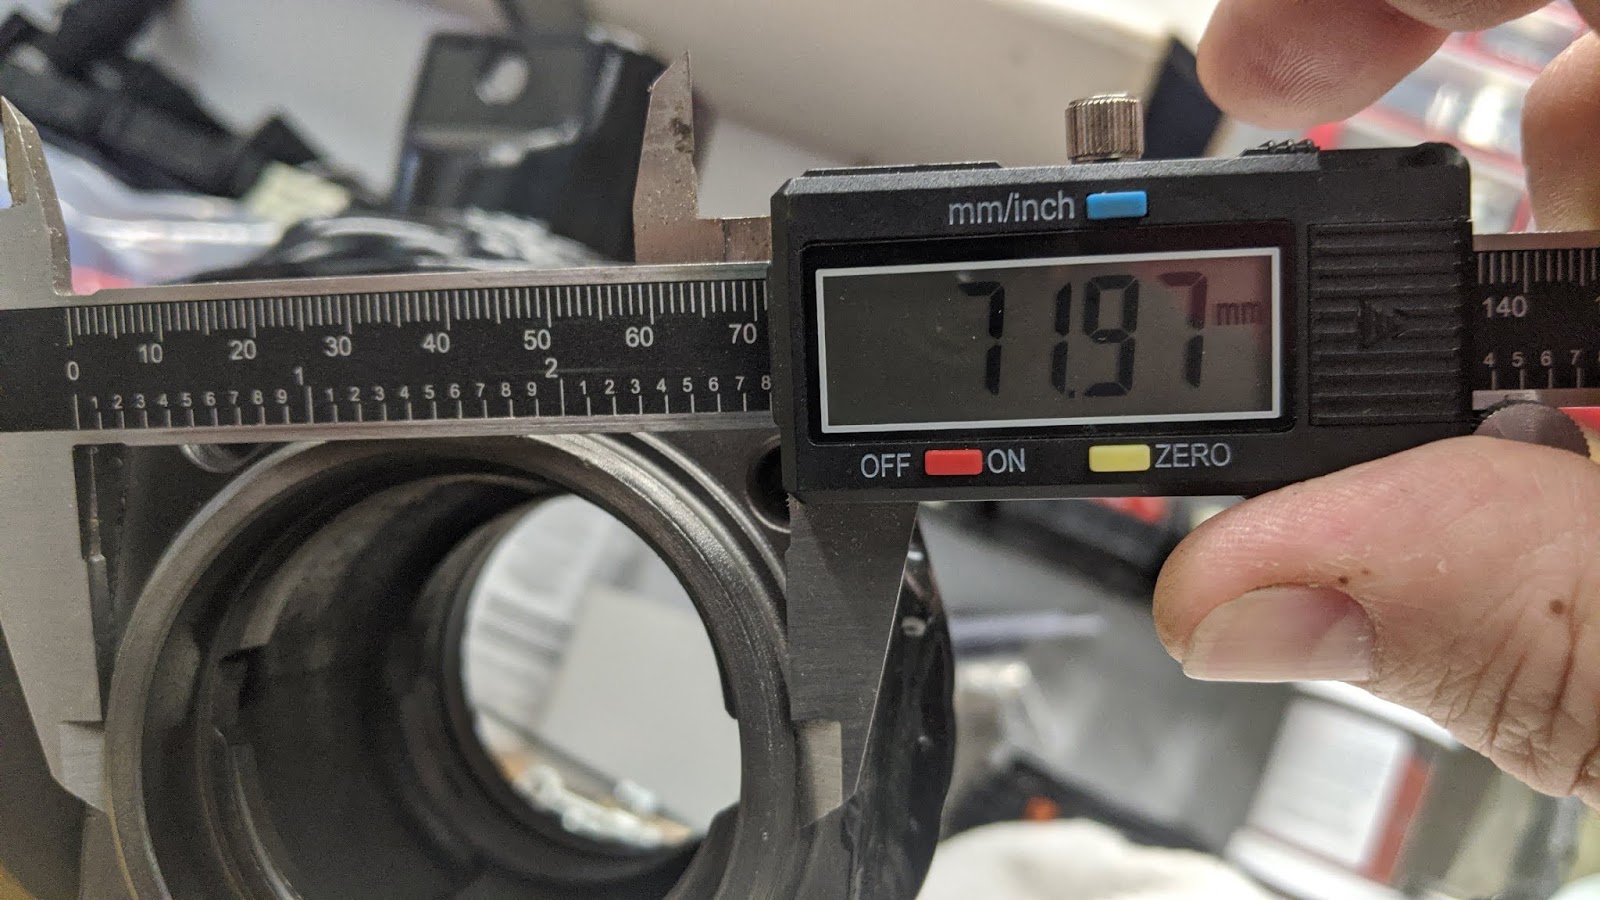
First thing, I checked the trailing arms to make sure they're round and not oval.
OD, axis X
OD, axis Y
Not a big difference and can be considered round for the purpose of this exercise.
The two arrows show the 'step' that's inside of the brake caliper bracket. I don't know why it's there but it is the singular reason I can't move forward.
This is the ID of the area where the red arrow above is pointing.
This is the ID of the area where the blue arrow is pointing.
A little simple math shows that if this weird step didn't exist, I wouldn't be posting this - I'd be posting about how I'd finished installing both stub axles and the bearings.
The difference is about half a millimetre - enough that I probably shouldn't try to bash the aluminum caliper bracket onto the steel trailing arm. I've reached out to a local machine shop to figure out the cost of removing the step inside the housing.
I ordered the Setrab oil cooler mounts that I was avoiding - I thought I could get it mounted without them but what appears to be the right place for this oil cooler required them so I didn't have much of a choice. Once the oil cooler and filter mounts are sorted, I'll be circling back to the pan hole misalignment, seat belt mounts and a few pan specific issues - once those are done, I should be in a much better place to have the car back on four tires and driving. I just need to get past one milestone before I get too excited about the next one.
This all assumes that the house doesn't require more attention and money - most of my time/energy/money has gone into the house and it'd be great if that stopped real soon.
Friday, May 1, 2020
"Character is fate"
After screwing around in AutoCAD for the better part of three hours - I wasn't able to make anything even remotely resembling the template I made out of paper...so I reached out to my counterpart and asked if I could 'hire' him to input the part template into AutoCAD if I sent him the part. He agreed and now the part is on its way to Arizona. If all goes well, in about 2 weeks, I should have the part in hand...and have a plan for hoses to finally close up the engine.
I was in a bit of a time crunch as my laptop (first computer I've owned in the last 15 years that I didn't build) had to be sent in to Dell to be repaired. The battery was swelling and pushed the touchpad out of the frame. I might have it back by the end of next week.
I spent a bit of time holding the Setrab oil cooler up in various places over the subframe/transmission area trying to find a suitable location to mount it...after lots of holding, thinking and head scratching, I decided that it's going to have to be mounted to the sheet metal tray that's over the transmission - with the fan pulling the hot air down. The IRS rear end has a lot going on - add to that the rear disc brakes with wily parking brake cables, the accelerator cable, clutch cable, fuel line and there's just not that much space under there. I may make one last session of holding it up in random spots on the passenger side since there's less going on with that side but I'm okay with the 'so far' found mounting location. It'll allow me to move on to other things and feel like I'm making progress, even if I'm only fooling myself.
The used rear seat kick panel that I bought showed up - it's in decent shape - hard to visualize now that I know there's a NOS panel en route. It'll go up in the rafters of the garage for a bit until I figure out what to do with it.
I've been digging through every thread I can find that details the IRS pan Type 3 because I know there are differences - looking for those details that might help me figure out how to route the brake lines from the early pan to a later suspension.
This picture I pulled from Brent's build thread on TheSamba.com is a good shot of a late pan that gives me some good ideas of how to fix a few things on my pan to simplify the brake lines.
Perhaps I'm getting ahead of myself by moving past the oil cooler planning bit...assuming it's ready to be closed. I really wish I wasn't such a fucking perfectionist - I would have been done with this car years ago.
I never noticed before but the late pan doesn't have the set of mount brackets on it like the early/swing axle pan. I could remove those and relocate the T mount to a more sensible place (the early location for the brake line T is absolutely ridiculous) and simplify the whole thing. The gears in my head are turning.
I was in a bit of a time crunch as my laptop (first computer I've owned in the last 15 years that I didn't build) had to be sent in to Dell to be repaired. The battery was swelling and pushed the touchpad out of the frame. I might have it back by the end of next week.
I spent a bit of time holding the Setrab oil cooler up in various places over the subframe/transmission area trying to find a suitable location to mount it...after lots of holding, thinking and head scratching, I decided that it's going to have to be mounted to the sheet metal tray that's over the transmission - with the fan pulling the hot air down. The IRS rear end has a lot going on - add to that the rear disc brakes with wily parking brake cables, the accelerator cable, clutch cable, fuel line and there's just not that much space under there. I may make one last session of holding it up in random spots on the passenger side since there's less going on with that side but I'm okay with the 'so far' found mounting location. It'll allow me to move on to other things and feel like I'm making progress, even if I'm only fooling myself.
The used rear seat kick panel that I bought showed up - it's in decent shape - hard to visualize now that I know there's a NOS panel en route. It'll go up in the rafters of the garage for a bit until I figure out what to do with it.
I've been digging through every thread I can find that details the IRS pan Type 3 because I know there are differences - looking for those details that might help me figure out how to route the brake lines from the early pan to a later suspension.
This picture I pulled from Brent's build thread on TheSamba.com is a good shot of a late pan that gives me some good ideas of how to fix a few things on my pan to simplify the brake lines.
Perhaps I'm getting ahead of myself by moving past the oil cooler planning bit...assuming it's ready to be closed. I really wish I wasn't such a fucking perfectionist - I would have been done with this car years ago.
I never noticed before but the late pan doesn't have the set of mount brackets on it like the early/swing axle pan. I could remove those and relocate the T mount to a more sensible place (the early location for the brake line T is absolutely ridiculous) and simplify the whole thing. The gears in my head are turning.
Tuesday, April 28, 2020
New template for the oil filter bracket
Made some adjustments to the template - created this paper version.
A guy on TheSamba.com made me aware of a website called SendCutSend.com - they will laser cut parts if I send a .dwg or .dxf drawing and a few pieces of information. I spent over an hour trying to remember enough of AutoCAD to get the template into the program. I failed. I may just have to find a local shop to make the part. It'll be more expensive but I don't have the time or patience to re-learn AutoCAD to create a drawing to then get the part made.
Monday, April 27, 2020
"Commitment is an act, not a word."
A conversation and some frustration turned into the purchase of a NOS rear seat kick panel. I didn't think these existed but at least one does and I bought it. I can take this off the list of 'shit I have to find' and move it to the list of 'shit I have to get put on the car'.
There are a few minor issues with this piece - nothing serious. It should go into the pan pretty easily. There's no secret that the pan needs some rather significant work to be correct for the body of the car. I may as well do it right. I don't want to look back on this and regret taking a short cut 'a while ago'.
The seat belts will need brackets welded to the pan, the rear seat kick panel will be replaced, the brake tubes will need to be tweaked to work with the IRS rear end.
I bought these years ago and have been dragging them from house to house as we move all over the place and I wondered if I'd ever use them. I now know the answer.
I took a trip to Home Depot and picked up a piece of sheet metal. I traced the FastFab bracket and make it one hole longer.
It's rather ugly in appearance - but I was able to confirm that, if made correctly, it'll fit and work. I might make another one - drilling the holes first and I'd make a slight change to the bracket.
Sometime next week when things are a little less nuts I will seek out a fabrication shop to make one that's more suitable in appearance and fit.
Next up is the bracket for the oil cooler - then I can get that chapter closed. I can't fucking wait.
There are a few minor issues with this piece - nothing serious. It should go into the pan pretty easily. There's no secret that the pan needs some rather significant work to be correct for the body of the car. I may as well do it right. I don't want to look back on this and regret taking a short cut 'a while ago'.
The seat belts will need brackets welded to the pan, the rear seat kick panel will be replaced, the brake tubes will need to be tweaked to work with the IRS rear end.
I bought these years ago and have been dragging them from house to house as we move all over the place and I wondered if I'd ever use them. I now know the answer.
I took a trip to Home Depot and picked up a piece of sheet metal. I traced the FastFab bracket and make it one hole longer.
It's rather ugly in appearance - but I was able to confirm that, if made correctly, it'll fit and work. I might make another one - drilling the holes first and I'd make a slight change to the bracket.
Sometime next week when things are a little less nuts I will seek out a fabrication shop to make one that's more suitable in appearance and fit.
Next up is the bracket for the oil cooler - then I can get that chapter closed. I can't fucking wait.
Thursday, April 23, 2020
"We are terrorized and flattened by trivialities, we are eaten up by nothing."
A couple of years ago, I bought a FastFab bracket and attempted to use it to mount the oil filter bracket. I very quickly determined that it wouldn't work because it wasn't a direct fit. The one piece I should have immediately recognized is that NOTHING on this car is a direct fit and acted accordingly. But because I'm a stubborn dumbass, I went in a completely different direction.
I spent a ridiculous amount of time trying to find another place to put this blasted thing. And guess what? I'm right back to where I was two fucking years ago...it's not a direct fit, per se, but it's real close.
It's in a fairly good spot here - not super close to the J tube, easily accessed for oil filter change, not in the way of the valve cover.
It is, however, large enough that the thermostat side gets within 1/2" of the header pipe. I'm hoping that wrapping the header with fiberglass wrap will help control the heat and not cook the thermostat. Short of this - I guess I could get a custom bent pipe for the exhaust that allows for more space.
The plan is to contact FastFab and see if I can interest them in making a modified version of their bracket for this location. Failing that, I'll use their stock bracket as a template to have one made on a waterjet. I am not super concerned about how 'pretty' it is if it works. Once this is sorted, I'll figure out where to put the oil cooler and get brackets made for that...then work on getting the hoses made and connected.
View from the rear - showing the space between the J tube and the oil filter.
It's not solved yet - but it's feeling close.
Once I get this part done, I can fire up the engine and make sure it's still in good shape. And then figure out how to get that heat shield installed!
I spent a ridiculous amount of time trying to find another place to put this blasted thing. And guess what? I'm right back to where I was two fucking years ago...it's not a direct fit, per se, but it's real close.
It's in a fairly good spot here - not super close to the J tube, easily accessed for oil filter change, not in the way of the valve cover.
It is, however, large enough that the thermostat side gets within 1/2" of the header pipe. I'm hoping that wrapping the header with fiberglass wrap will help control the heat and not cook the thermostat. Short of this - I guess I could get a custom bent pipe for the exhaust that allows for more space.
The plan is to contact FastFab and see if I can interest them in making a modified version of their bracket for this location. Failing that, I'll use their stock bracket as a template to have one made on a waterjet. I am not super concerned about how 'pretty' it is if it works. Once this is sorted, I'll figure out where to put the oil cooler and get brackets made for that...then work on getting the hoses made and connected.
View from the rear - showing the space between the J tube and the oil filter.It's not solved yet - but it's feeling close.
Once I get this part done, I can fire up the engine and make sure it's still in good shape. And then figure out how to get that heat shield installed!
Sunday, April 19, 2020
I wanted to seek but I got distracted
This doesn't look like much but it represents the surmounting of a rather large obstacle in the journey to getting this car back together and driving - my motivation to work on this car.
Two days ago, it was snowing...today it was up near 65°F. I mowed the lawn and pulled weeds. On my way into the house, just before I closed the garage door, I stopped to look at the car sitting in the garage covered in dust.
I decided to take a look at the rear end and see if I've got any new ideas for the few minor modifications that are required to put the back end together. I didn't come up with anything for the rear brake lines - after a short time, I realized that it'd probably be easier to figure out if the shock and axle assembly were in place. I swapped out the trailing arm because the one that was in the car had a malformed bump stop mount - and I've got three fucking sets for one car, so why not?
I pulled out the parts for the rear stub axle, grabbed the parts book for an exploded view of assembly and set about assembly. A short time later, I swapped out the trailing arm and then spent an hour trying to figure out just where the hell I was going to put the oil filter/thermostat mount. Late into that hour I discovered a suitable location just behind the engine tin, slotted in the curve of the CSP Python exhaust. I can get to the valves without it (or the hoses) getting in the way, it won't be as susceptible to road debris and at least one set of braided lines will be short/straight. The mount location will require fabrication of a bracket that'll hang on the exhaust studs over the header but it should be rather sturdy. I'll make a test piece before I go spending the money to get one made. I'm content to have a location worked out at this point. Next up will be figuring out where/how to mount the actual cooler. Once I get past this obstacle of oil cooler/filter mount, I should be able to clear my head enough to get the other shit done. I'm super distracted by this part for some reason.
My list to finish before it's on the road again:
Two days ago, it was snowing...today it was up near 65°F. I mowed the lawn and pulled weeds. On my way into the house, just before I closed the garage door, I stopped to look at the car sitting in the garage covered in dust.
I decided to take a look at the rear end and see if I've got any new ideas for the few minor modifications that are required to put the back end together. I didn't come up with anything for the rear brake lines - after a short time, I realized that it'd probably be easier to figure out if the shock and axle assembly were in place. I swapped out the trailing arm because the one that was in the car had a malformed bump stop mount - and I've got three fucking sets for one car, so why not?
I pulled out the parts for the rear stub axle, grabbed the parts book for an exploded view of assembly and set about assembly. A short time later, I swapped out the trailing arm and then spent an hour trying to figure out just where the hell I was going to put the oil filter/thermostat mount. Late into that hour I discovered a suitable location just behind the engine tin, slotted in the curve of the CSP Python exhaust. I can get to the valves without it (or the hoses) getting in the way, it won't be as susceptible to road debris and at least one set of braided lines will be short/straight. The mount location will require fabrication of a bracket that'll hang on the exhaust studs over the header but it should be rather sturdy. I'll make a test piece before I go spending the money to get one made. I'm content to have a location worked out at this point. Next up will be figuring out where/how to mount the actual cooler. Once I get past this obstacle of oil cooler/filter mount, I should be able to clear my head enough to get the other shit done. I'm super distracted by this part for some reason.
My list to finish before it's on the road again:
- The seat belts mounts need to be figured out
- The parking brake tubes out the rear of the pan need to be bent upward slightly
- New parking brake cables (custom, of course)
- New rear brake lines (may need to weld new brackets)
- Figure out the solution to coating for the spring plates (they're starting to rust through the zinc coating)
- Install the rear torsion bars/level the car
- Oval out the holes for the pan to fit the body (body mounting)
- Tweak the late oil/dipstick tube to fit the early body (slightly off)
- Figure out how to install the heat shield for the Python exhaust (doesn't fucking fit!)
- Send the transmission out for a new case
- Paint everything that was modified on the pan/subframe
- Assembly
2020 might be the year I get some of this done if I can get out of my own way.
Subscribe to:
Posts (Atom)